This tutorial provides a walkthrough of unique capabilities in Wings. Wings uses semantic constraints to reason about workflows and as a result it can assist the user to create valid workflows. You can try out for yourself all the examples mentioned in this tutorial. This site is set up with a simple set of workflows and datasets that you can use to test the capabilities of Wings.
For users that want to browse and execute workflows that are already pre-defined in the system by others. We give you an easy overview of Wings based on a public ''Portal'' (a place to play around). You can also create your own workflows using components that others have already pre-defined. Wings works in the browser, so there is no software to install if you use our web site and you can get started right away.
In order to use the portal, email us to set up an account.
If you are interested in installing the software, check our download page.
The following video shows an overview of this tutorial by creating and running a sample Text Analytics Workflow:
This web site will allow you to experience semantic workflow reasoning first hand through a simple user interface. The site uses Wings, a semantic workflow system with the following capabilities:
It is easy to try things out! You begin by selecting a simple workflow available in our catalog. We have sample datasets that you can use to try out this simple workflow. Once you see how to do that, you can upload your own data and run workflows with it. Skip to the next section if this is all you want to do!
To learn about the unique capabilities of Wings, you will need to use more complex workflows. In the following section of this tutorial, we will walk you through these capabilities with examples:
You can skip this section if you are already familiar with workflow terms. There is a glossary at the end of this document.
The running examples of this tutorial are simple manipulations of data contained in files. There are already workflows and datasets in the site that you can use, so you can quickly get familiar with the system. The workflows process the data for example by counting the number of lines in a file, removing duplicate lines, etc etc.
There are four simple workflows pre-defined in the site, each uses a slightly different approach to count the number of occurrences of words in various files in order to compare the files regarding their topic. The software components that are used as workflow steps are implemented using standard UNIX tools, python, and perl. Intuitively, we use one or more HTML and/or PDF files in a similar topic to generate a simple "topic model" and then apply a distance measure to compare this model to a newly given file.
Workflows manipulate datasets contained in files. In this case, files can be of one of these types: a formatted file (which can be an HTML file or a PDF file), a pattern file (which can be a file containing common words or containing special characters), etc.
Each dataset has associated metadata properties that describe its contents or anything else that is important about the dataset. For example, an HTML file has a size and a language properties.
To view the data and corresponding metadata properties that are used in this site, you can select "Manage Data" under the "Advanced" tab:
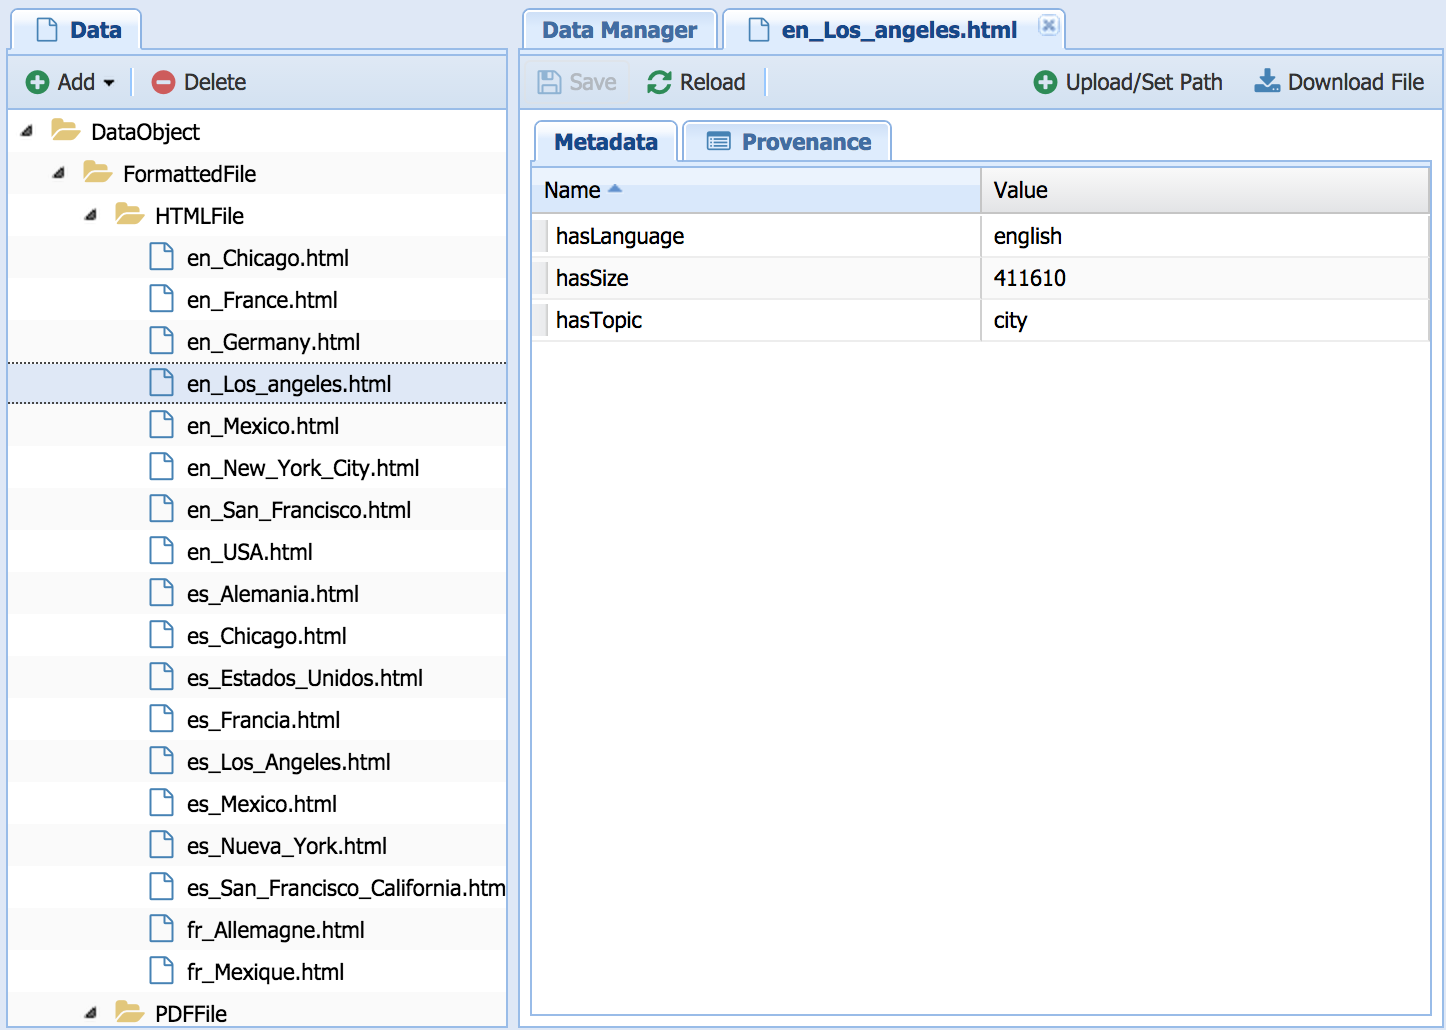
We have uploaded a few sample datasets. In the figure above, the "en_Los_Angeles.html" dataset has been selected, which shows that its language is "english", its size is 411610, and its topic is "city". We will see later on how Wings reasons about these properties when the datasets are used in the workflows.
NOTE: Behind the scenes, Wings uses a Data Catalog that contains all this information, and it represents types and properties as OWL ontologies and RDF statements. You will not see any of these ontologies in the interface, but the system uses them to reason about workflows.
We have pre-defined several kinds of workflow components or steps, which are software components that can be executed to process the datasets. Each component has input datasets that it processes, it has input parameters that can configure its function, and outputs that result from its execution. An example is countDuplicates, which takes as input a file of type WordListFile and a parameter that determines a threshold for a minimum set of occurences to be included, and outputs a file of type wordCountFile.
Each constituent of the workflow (i.e., each component, each dataset, and each parameter) has an associated variable, and the semantic constraints refer to these variables to qualify their properties or to state their relationships.
NOTE: Wings accesses a Component Catalog that contains descriptions of all these sofware components that form the workflow steps, their input and output datasets, their input parameters, and how to invoke the code that executes those operations. The descriptions are defined in OWL ontologies and RDF statements. You will not see any of these ontologies in the interface, but the system uses them to reason about workflows.
It will take you seconds to run a workflow in Wings and get results. Just follow the guidance in this section.
You can browse and run workflows that are pre-defined in the system. You do this by selecting "Run Workflows" under the Analysis Tab. There are several workflows that, as we will explain, are different but they all output an assessment of whether a dataset is similar to a given corpus by comparing the amount of words that appear in both. We will look into these workflows in more detail throughout the tutorial.
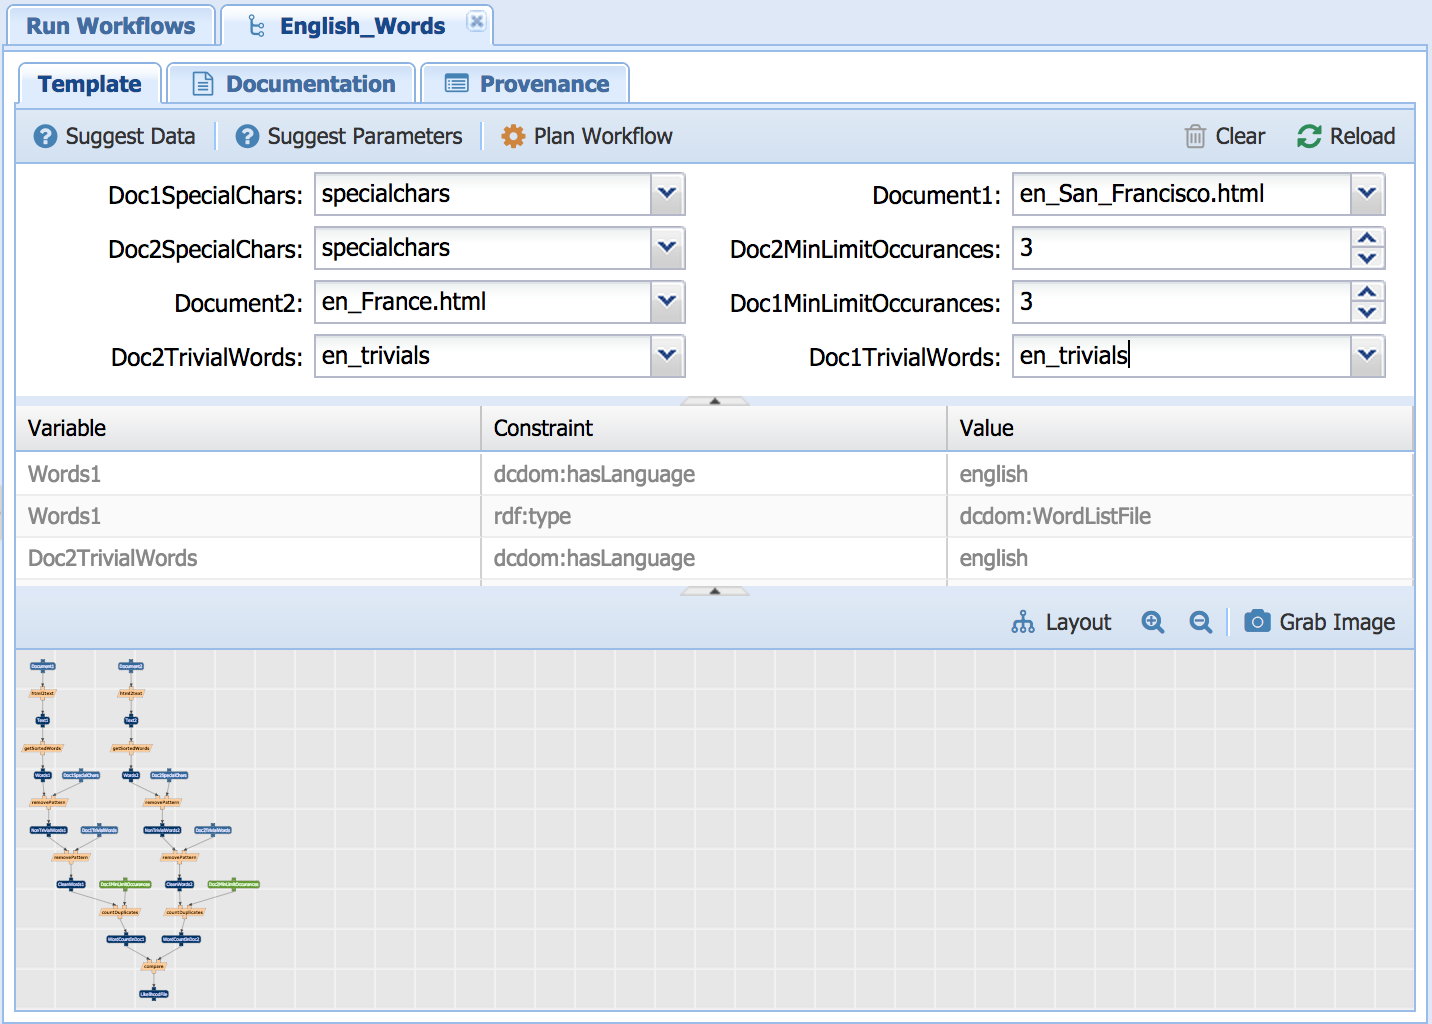
You can view a workflow by selecting it. If you select the workflow named "English Words" you will see its semantic constraints:
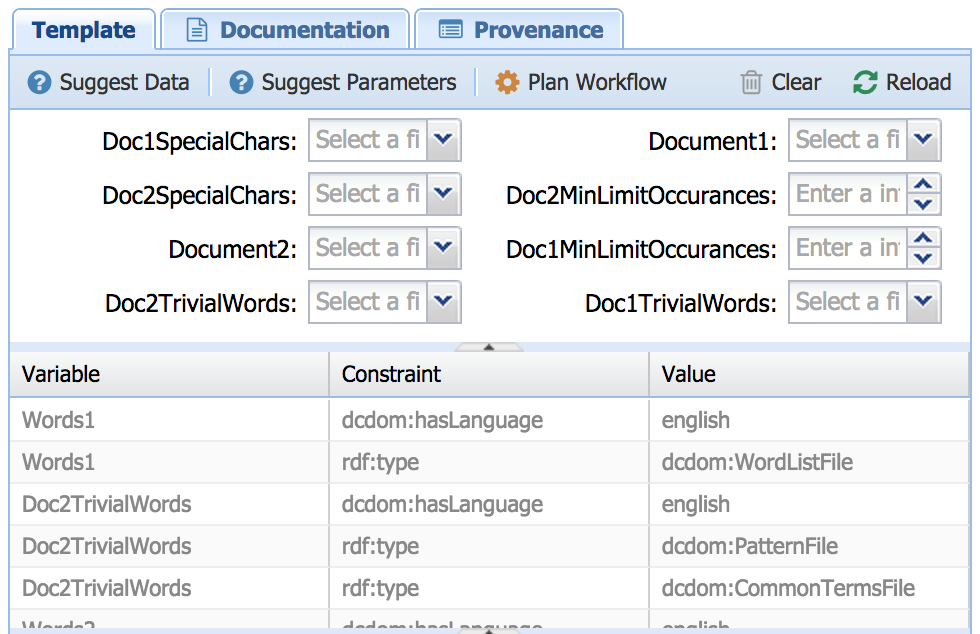
This table shows the semantic constraints on the data variables of the workflow. For example, Words1 has to be of type WordListFile. It also shows that the Words1 should also haveLanguage 'english'.
You will also see a diagram that shows the dataflow among components:

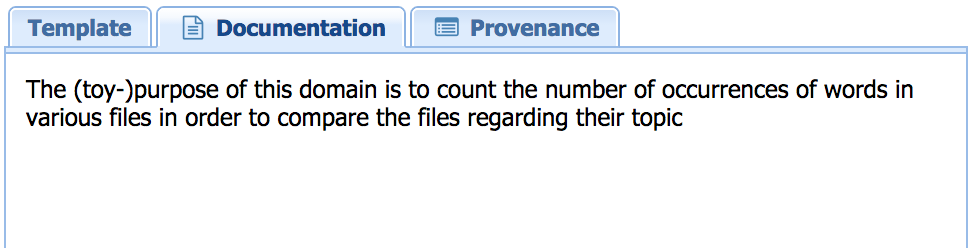
You can find a description of what the workflow does under the "Documentation" tab:
The workflow diagram shows the dataflow among the steps of the workflow. These steps are shown as light orange rectangles. For example, there is a step called html2text, it takes an HTML file as input and it generates a file in plain text without the HTML markup. Each dataset in the workflow has a variable associated with it that is unique within the workflow. For example, one of the input files is called Words1. Datasets in the workflow are shown in blue ovals. Input Datasets are shown in green ovals. Workflow steps can have parameters that control their behavior. For example the countDuplicates step has a Doc1MinLimitOccurances parameter that does not list words in the output that appear less times than the value of that threshold. Parameters also have unique variables associated with them, and are shown as orange ovals.
NOTE: The workflow representations used internally in Wings are more complex than what is shown in the user interface. They are used by the system but we do not explain them in this introductory guide. Please consult our Advanced Tutorial to learn more.
When you are viewing a workflow, you will see a set of menus at the top. For each dataset that is input to the workflow, Wings will show you a pull down menu with all the datasets that are of an appropriate type. For each input parameter, it will allow you to specify a value and it will indicate the type expected. If you select an input dataset, it will be highlighted in the workflow view in bright yellow. The constraints associated with it will also be highlighted.
For our example workflow, you will see the following:
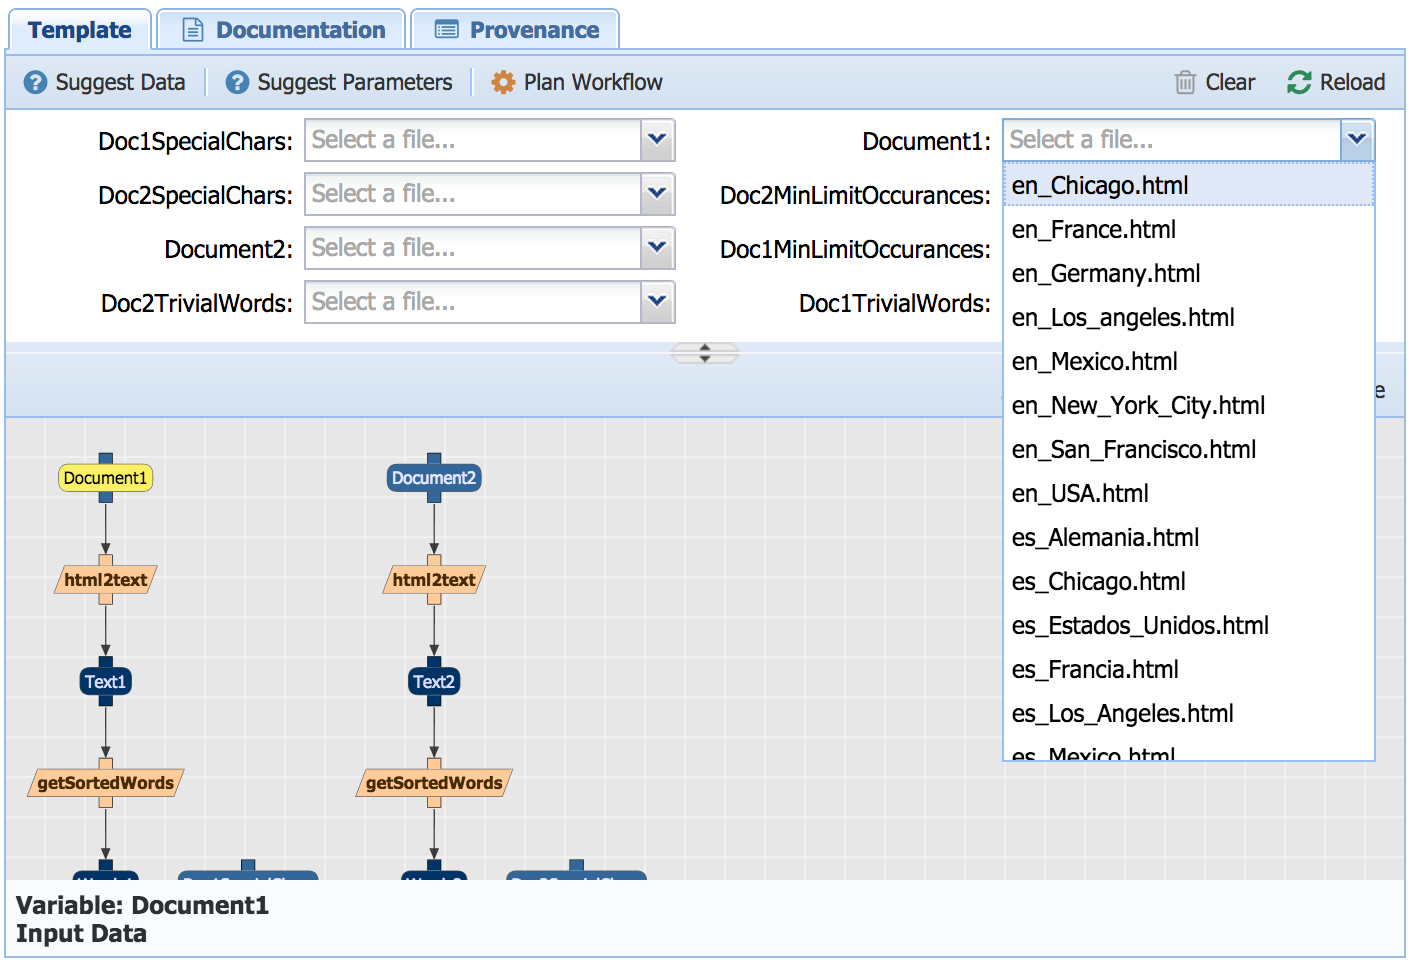
Notice that Wings is already helping you by giving you only options for input files that might be appropriate for this workflow by reasoning about types. In this case only html files are offered for selection.
As shown below, Complete all inputs by Selecting from the menus of input files offered. Enter some value for the two parameters, a good value to provide is 3
NOTE: We will see in a later section how Wings can validate your workflow by alerting you of inappropriate parameter settings, and help you by suggesting correct parameters values.
That's it! You are now ready to run your workflow.
Once you have selected input datasets and parameter values, you can select "Plan Workflow" to submit your workflow for execution. To execute the workflow, select the desired workflow you would like to run and select "Run Selected Workflow":
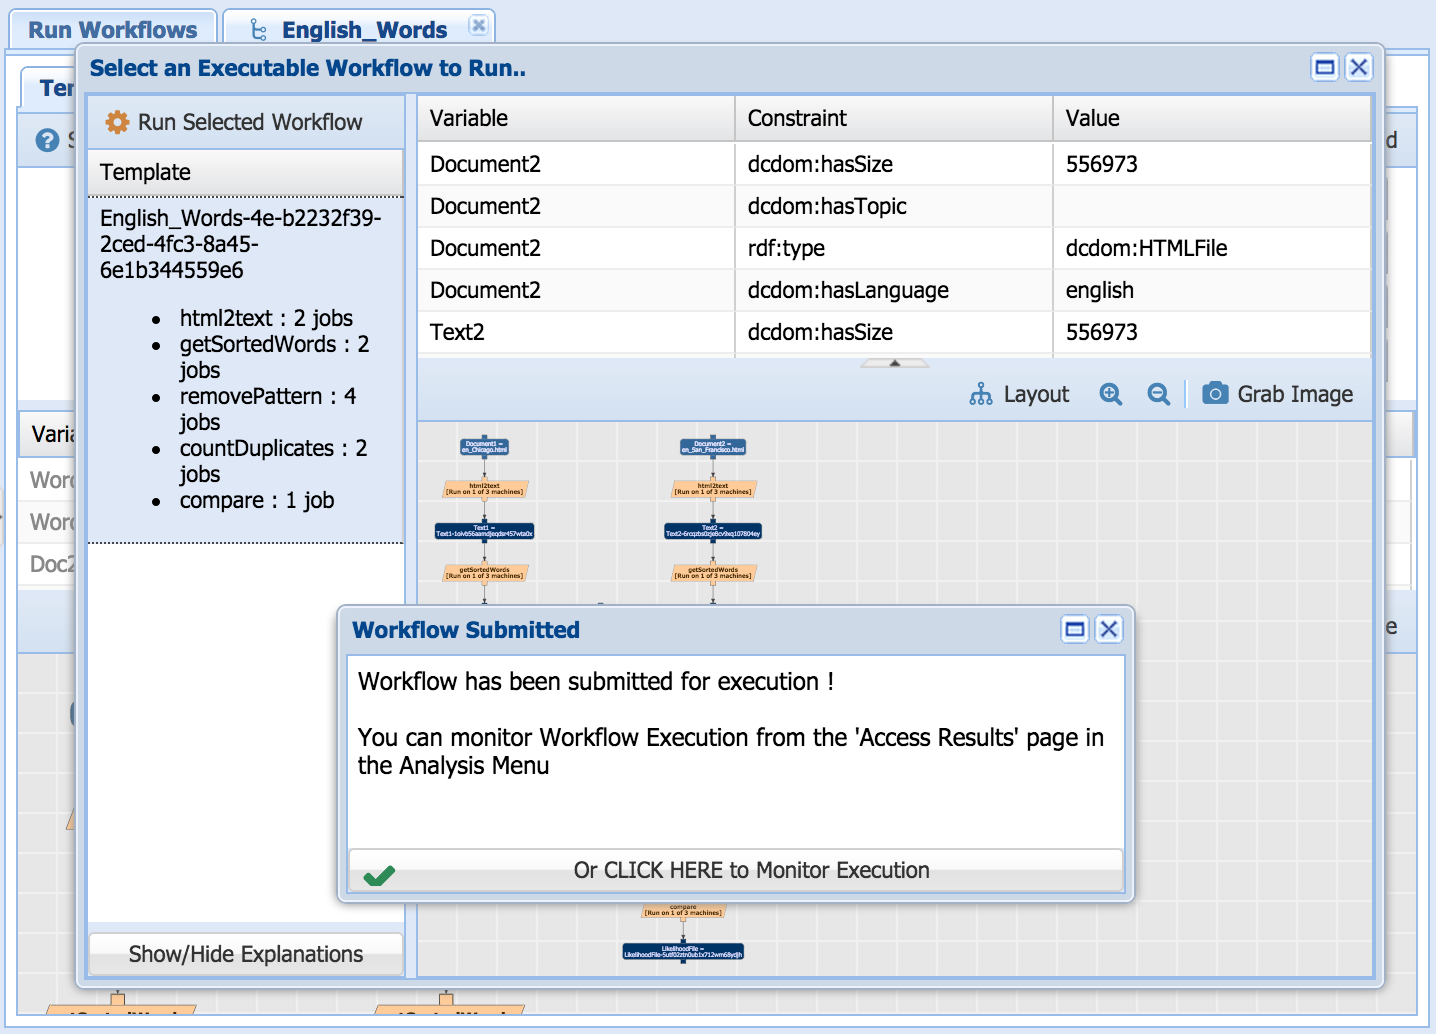
The workflow will run in the background.
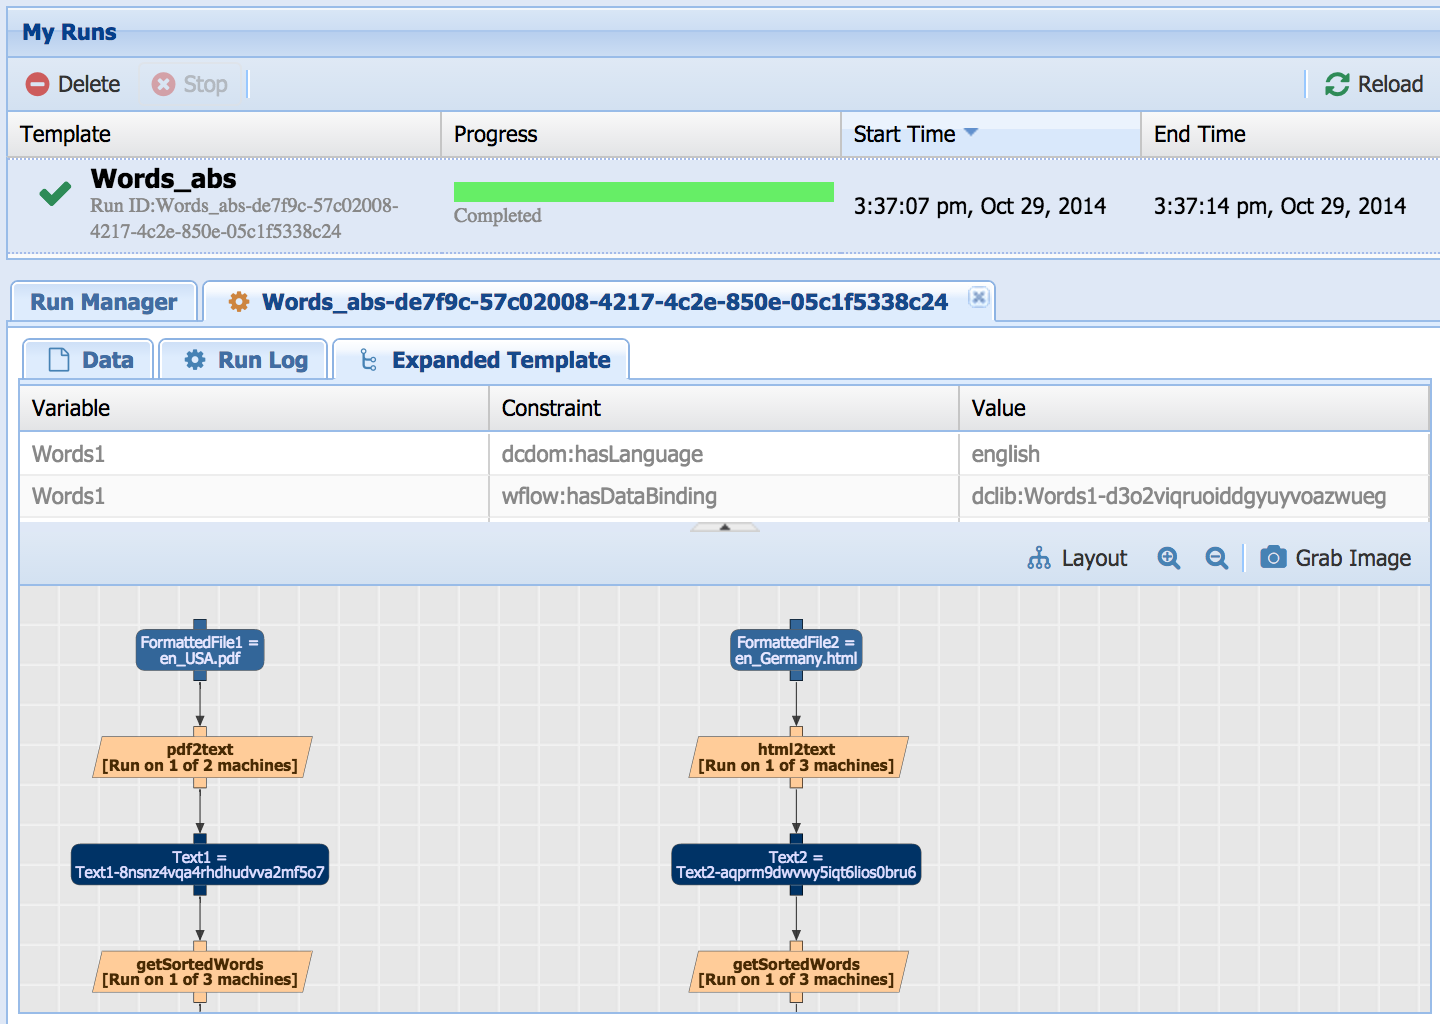
You can view the results by selecting the "Access Runs" in the "Analysis" tab. The workflow takes a few minutes to execute. You can refresh the page, and see a report of its progress:
NOTE: Behind the scenes, the workflows in the portal can be executed by a variety of execution engines. For the purposes of the sandbox, they are converted into and executed as a shell script.
You can view execution results at any time by selecting "Access Runs" in the "Analysis" tab. All the workflows that you have successfully submitted for execution are shown there. For each workflow execution, you can view the results, the logging output, and the workflow used.

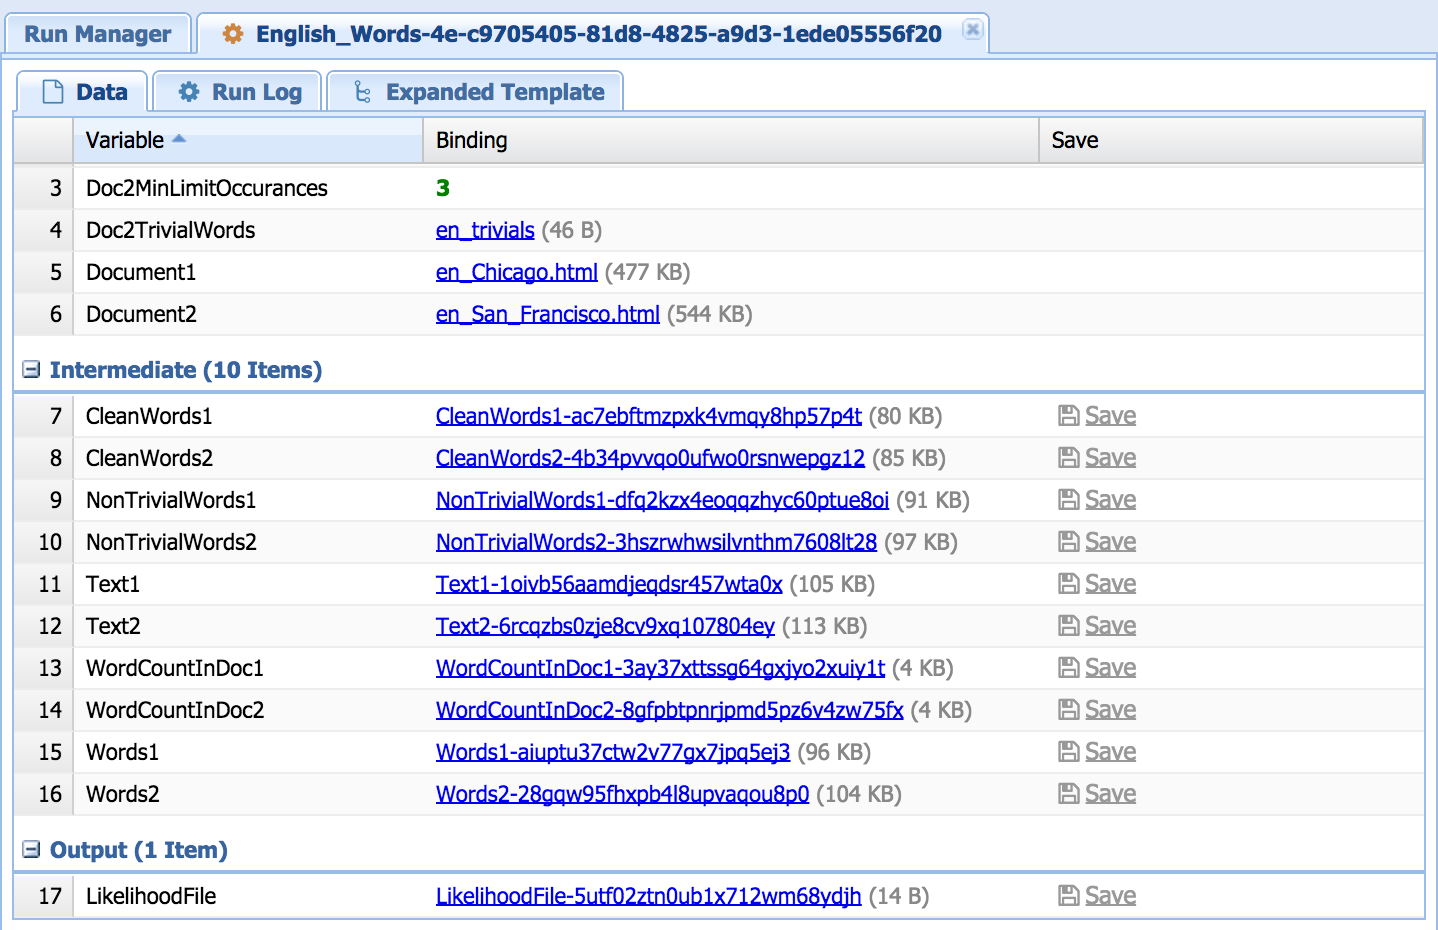

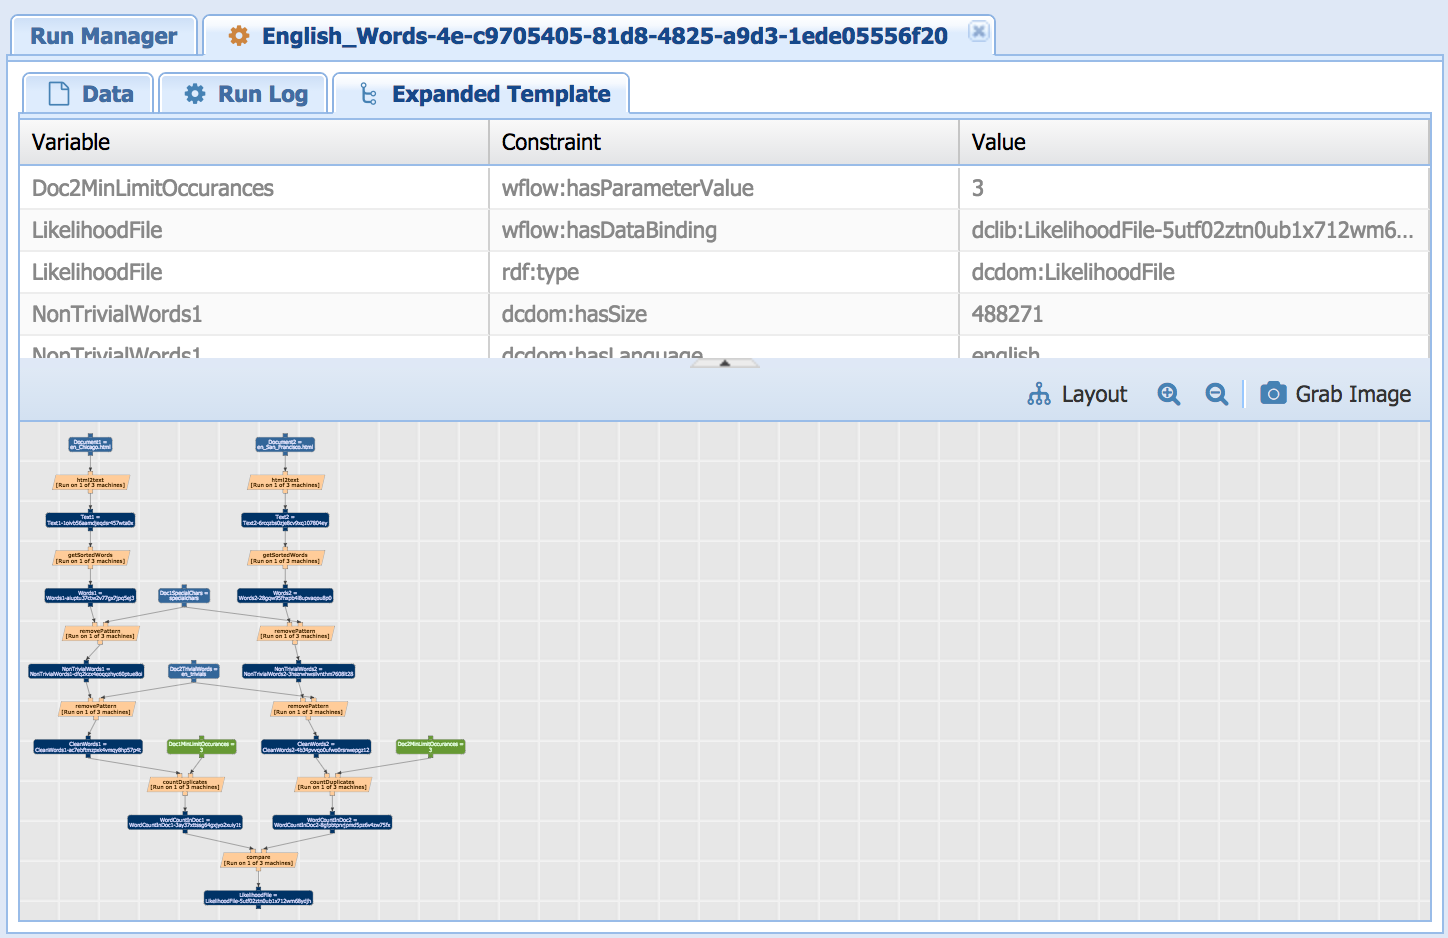
In the "Data" tab, you can click on any intermediate and final datasets and view them. You can also see a report of how many times each component was invoked, and how long it took.
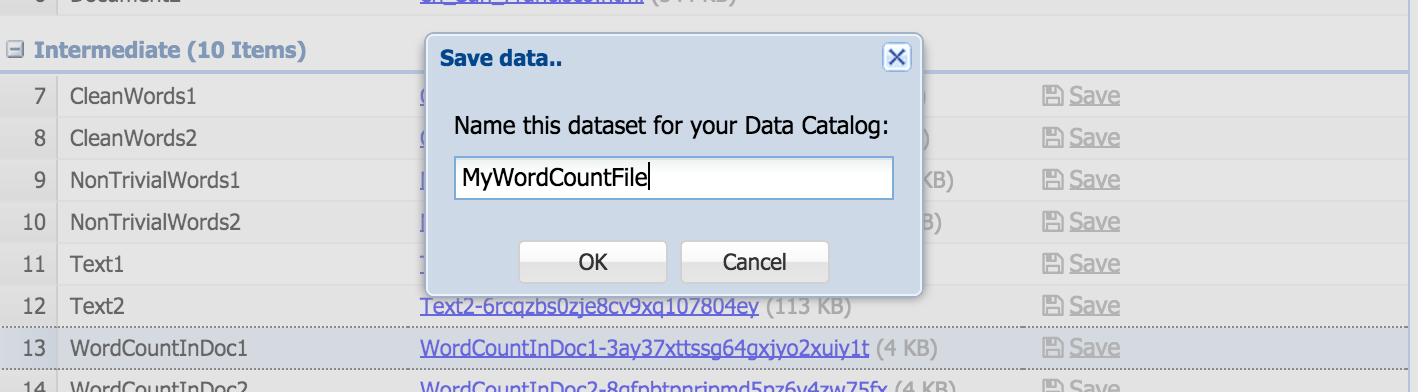
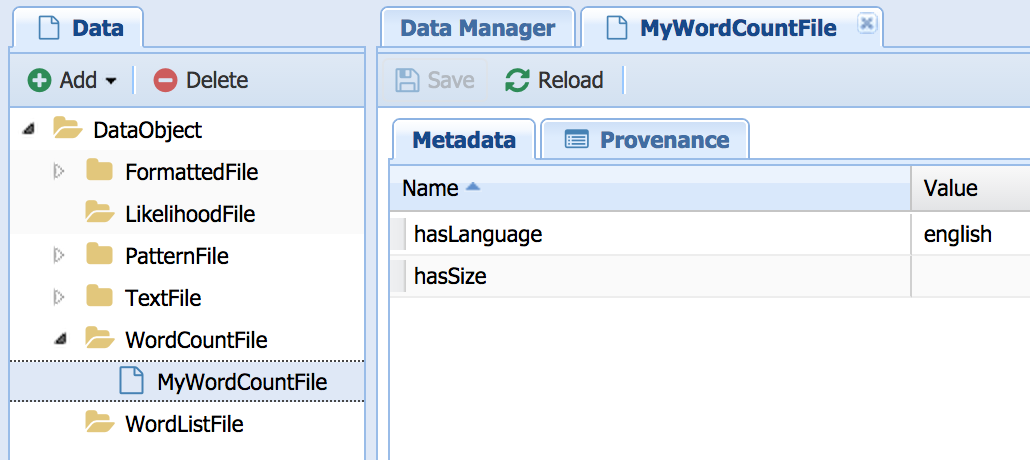
In addition, you can save any generated output files back into the data store for later use. To do so click the "Save" link next to the file name. You will be asked to give a more appropriate name to the file. Note that the file will be stored with all the meta-data that Wings has inferred about it! This is one of the distinguishing features of Wings, possible due to the use of semantic annotations and propagation of meta-data properties. So for instance, after executing a very simple workflow that creates a WordCountFile from a TextFile, and saving it back into the data store, when we go back to "Manage Data" (under 'Advanced' tab), we can see the newly created file in the appropriate semantic "folder", "WordCountFile". Note that its meta-data properties are already filled in, as they were inferred by Wings.
So far we have shown how simple workflows can be easily run. What is unique about Wings is that it can represent semantic constraints of workflows and reason about them to assist a user. This section of the tutorial shows several scenarios where you can see these capabilities at work.
Wings can propose parameter values for a workflow once you have selected what datasets you want to use. To do this, Wings reasons about semantic constraints that determine the best values of parameters based on metadata properties of the datasets you have selected. Once you have selected the input datasets for your workflow, you can select the "Suggest Parameters"button:
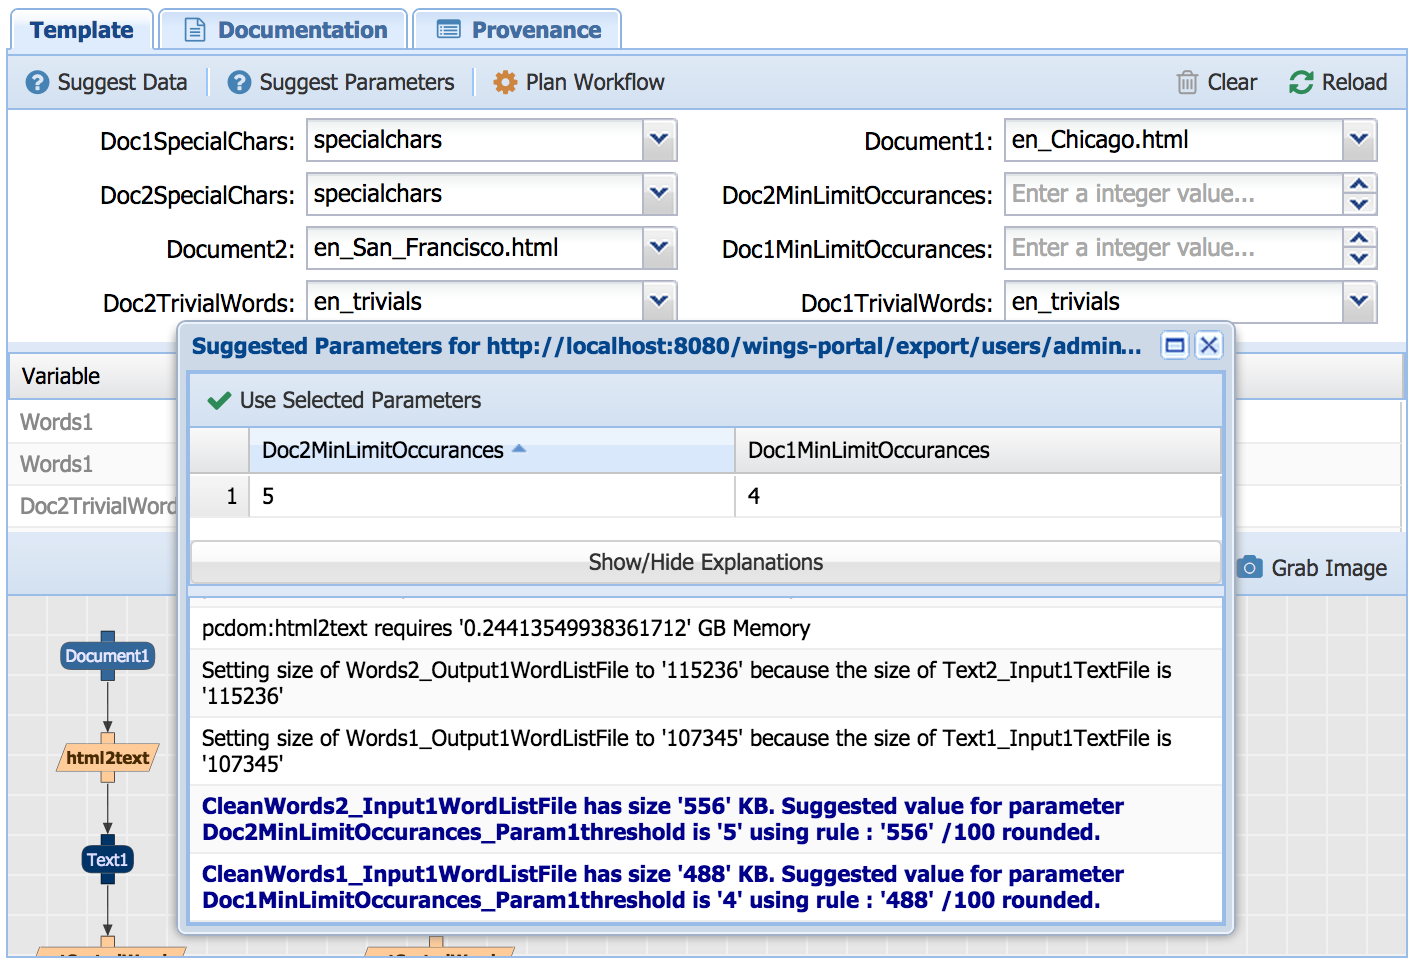
A pop up window shows you suggested parameter values. In this case, there is a constraint that the threshold parameters should be set depending on the metadata property size of the input. If you select a different input dataset, then the system will suggest different values for these parameters. The pop up window offers this explanation highlighted in blue. The explanation also contains other inferences that Wings has made based on propagating constraints throughout the workflow. The suggestions for parameter values often depend on these inferences, which are not part of the semantic constraints table that you see for the workflow.
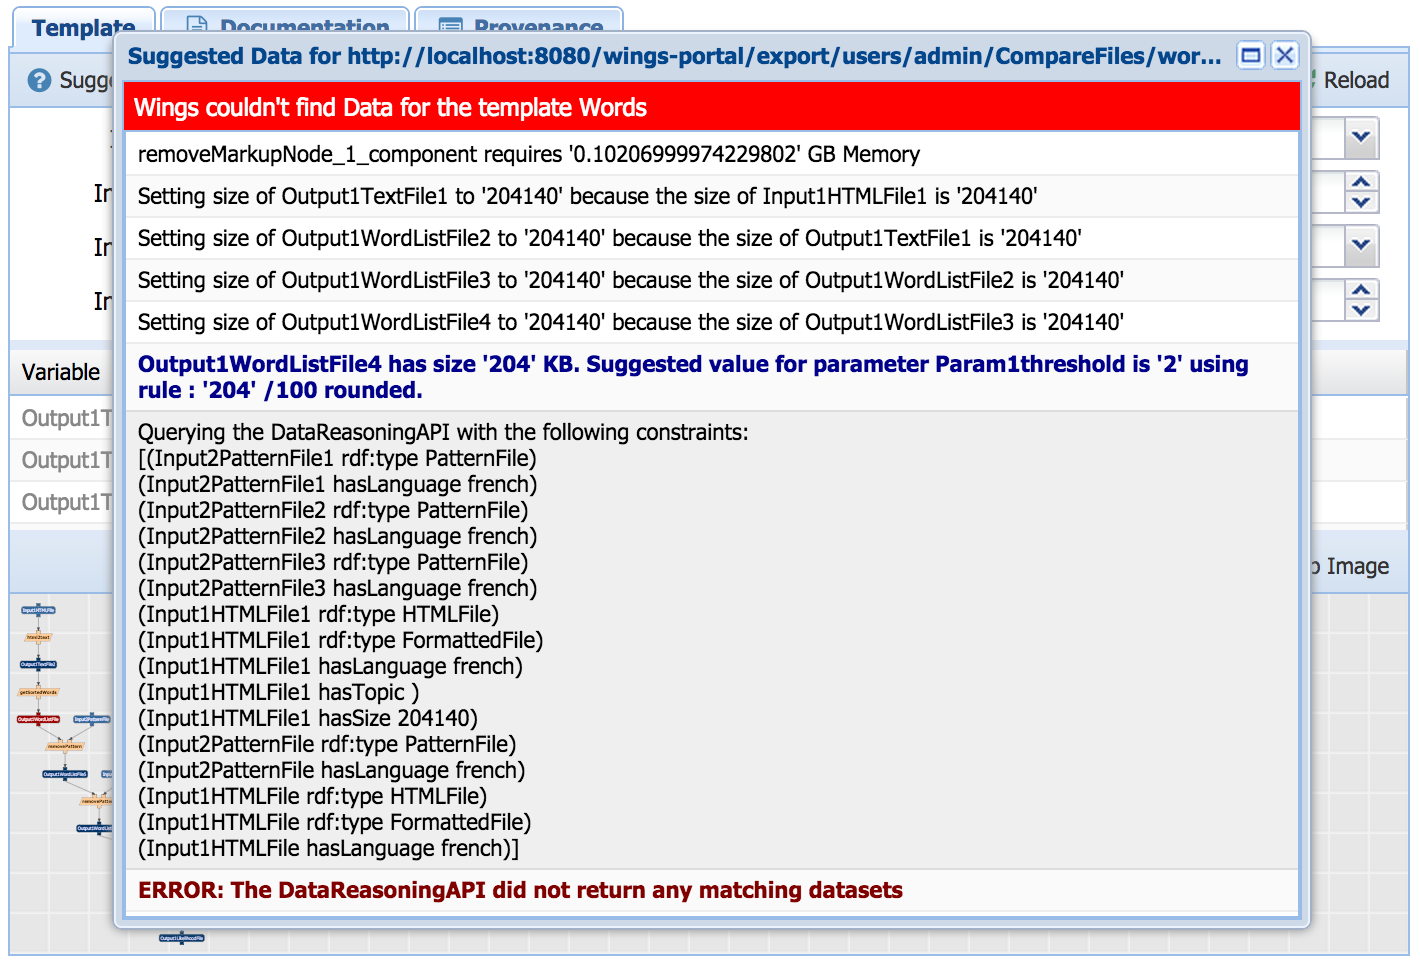
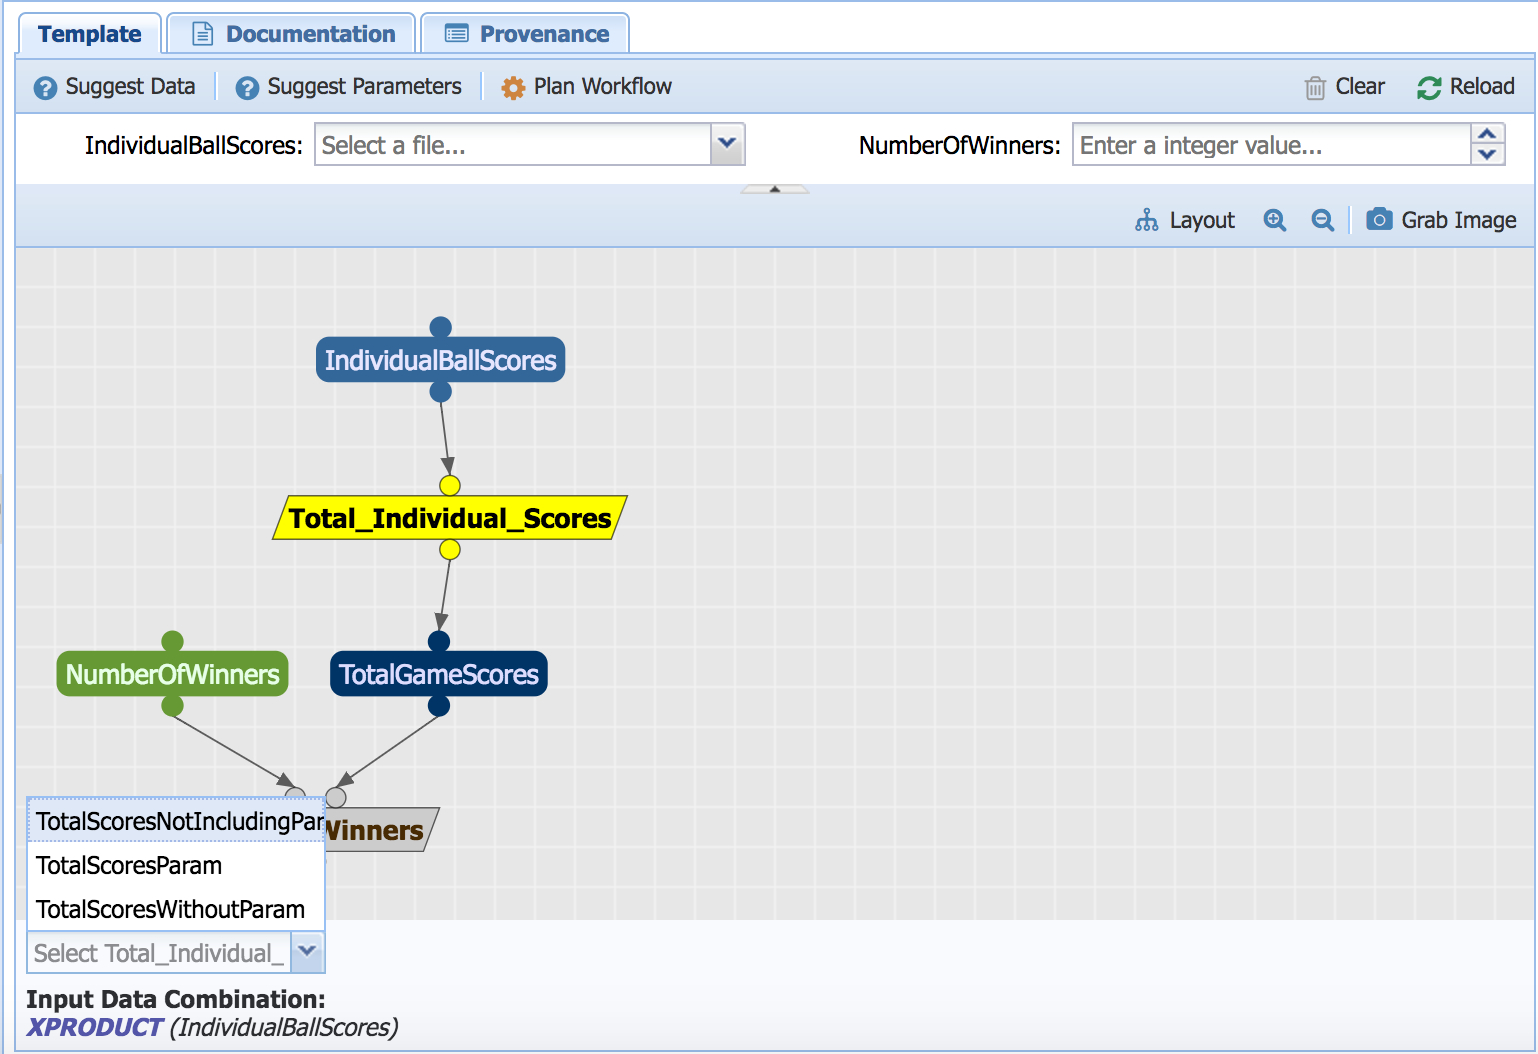
You can also ask Wings for suggestions on what datasets to use. Here, we can select input files and ask for suggestions for pattern files by selecting the "Suggest Data"button:
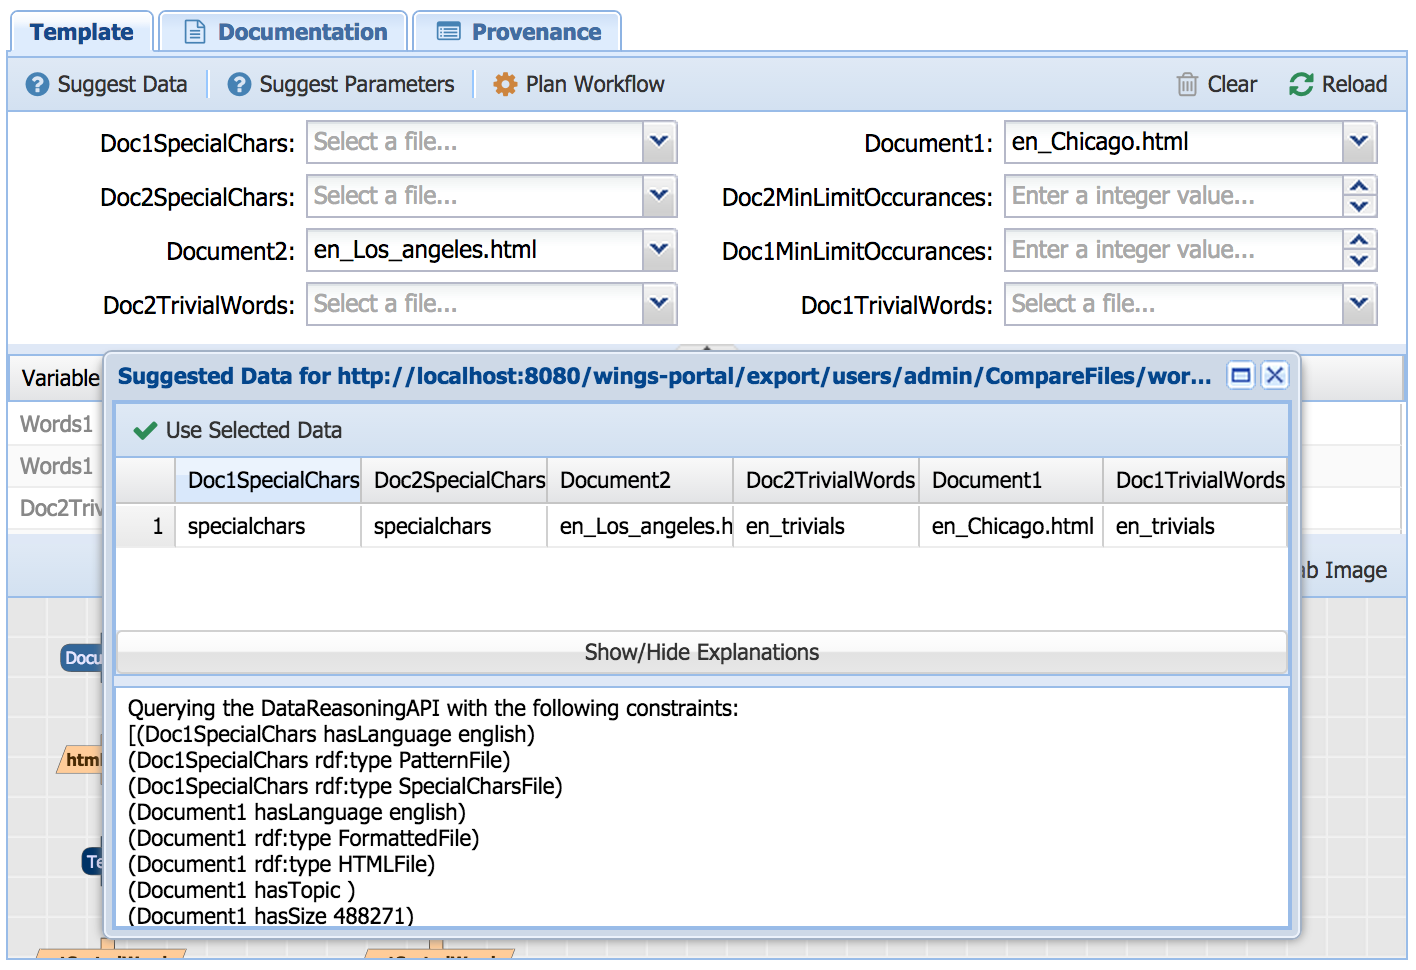
Using a constraint that states that the pattern files must have the same language as the input files, Wings suggests appropriate pattern files from all those available. An explanation is shown to justify why the particular datasets suggested are appropriate. This explanation consists of semantic constraints that have been propagated through the workflow by Wings and that are not part of the semantic constraints table of your workflow description.
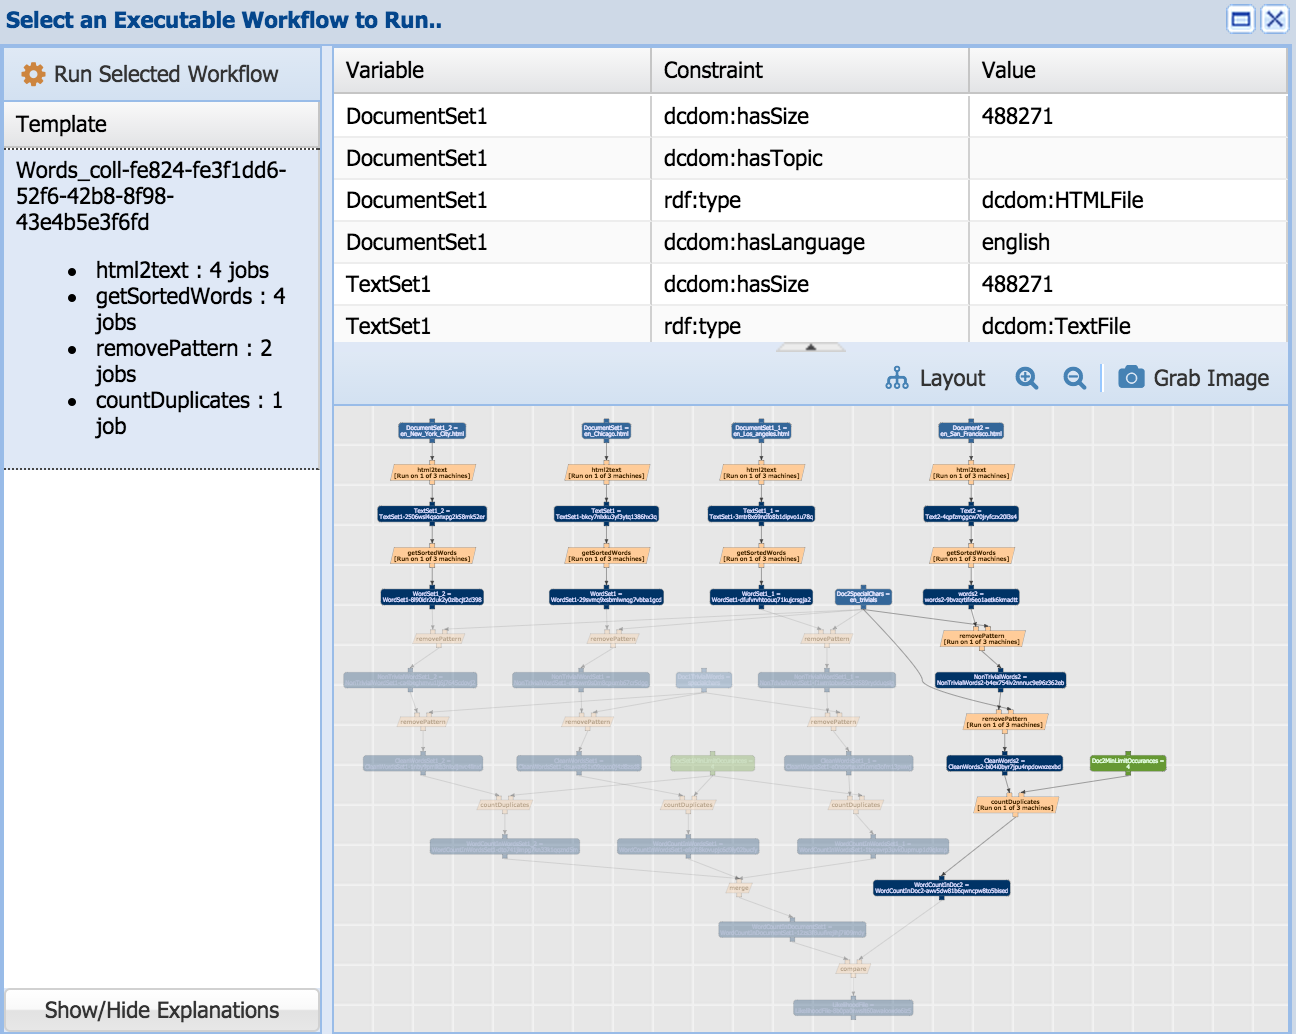
Wings can reason about a collection of datasets so that it is processed in parallel by the workflow. For example, if you select the Words Coll workflow you will see:

A multi-layered oval in the workflow diagram indicates that it is a data collection. When you select inputs for this variable, the drop down menu will allow you to select several files at a time. You can see at the bottom of the screen a comment that it is a collection.
Try for example selecting multiple html files, and submit the workflow for execution. When you Plan Workflow, you can see that multiple html2text components are created (in this case we selected 4 files so the component was executed once for each of the 4 files):
NOTE: In this case, the collection of html files is one-dimensional, as it is a list of files. Wings can handle multi-dimensional collections of datasets, as well as collections of workflow components.
If you select input files and parameter settings that are inconsistent with the semantic constraints that are defined in the system, Wings will detect that and let you know that your workflow is invalid. For example, in the English_Words workspace, we mentioned earlier a constraint that the language of the input files and the language of the pattern files has to be the same. If we select files with disparate languages and then we submit this workflow for execution, Wings will inform us that we have an invalid workflow:
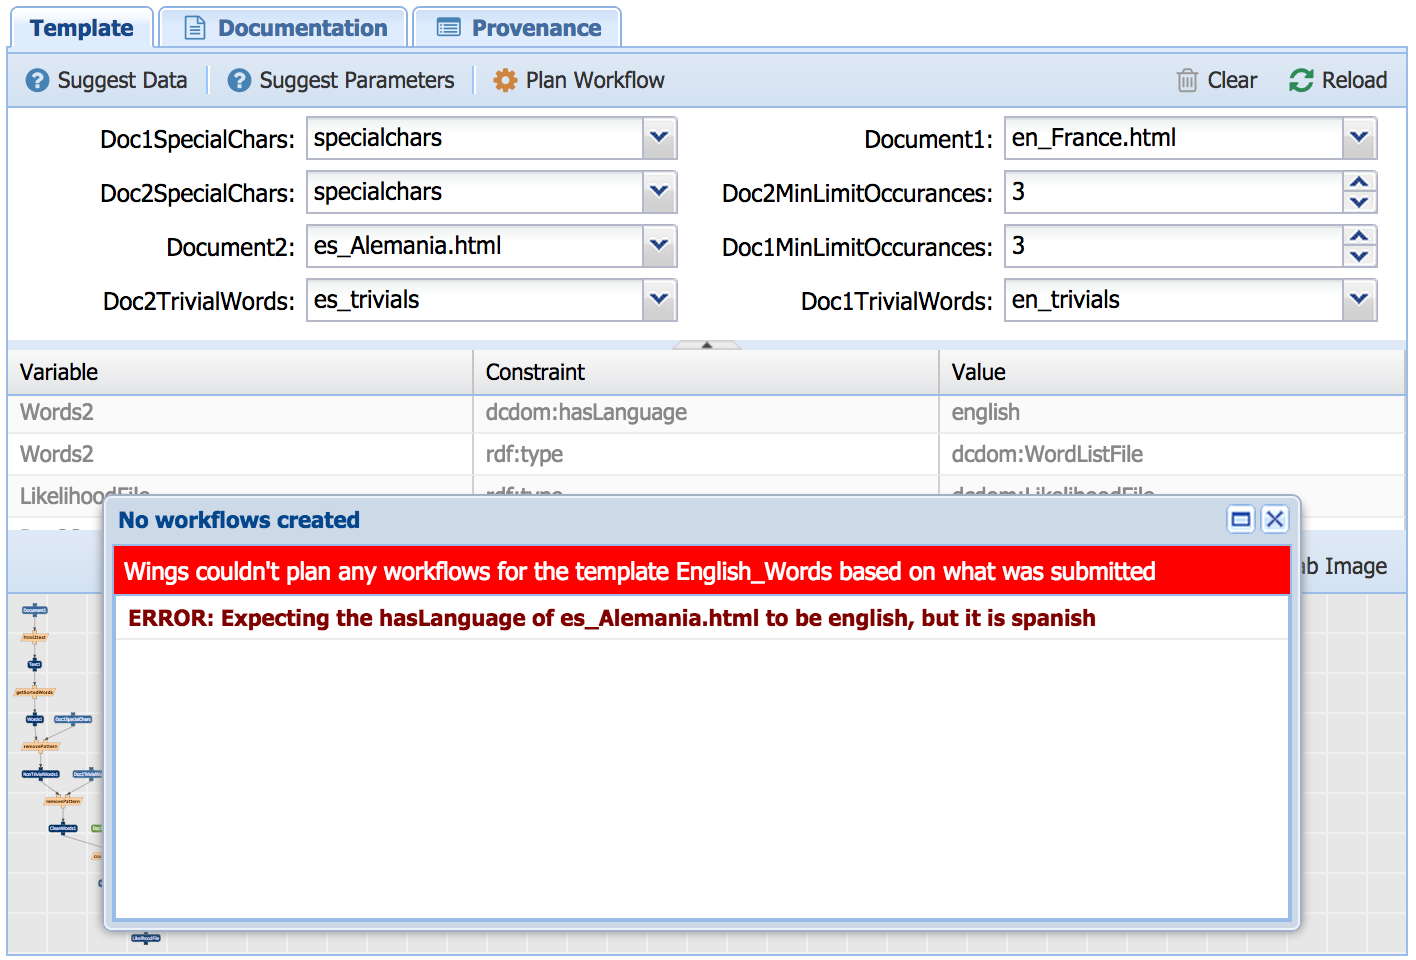
Wings can also alert a user if no workflow is possible for the selected input data. In the following example, the file selected in French and there are no pattern files available in that language that could be used:
Wings figures this out based on the semantic constraint for removePattern that its input pattern files have to be in the same language as the input word list files.
This validation capability is very helpful, as Wings is keeping track for the user of all the constraints that are defined in the domain and ensuring that any workflow that a user creates is valid.
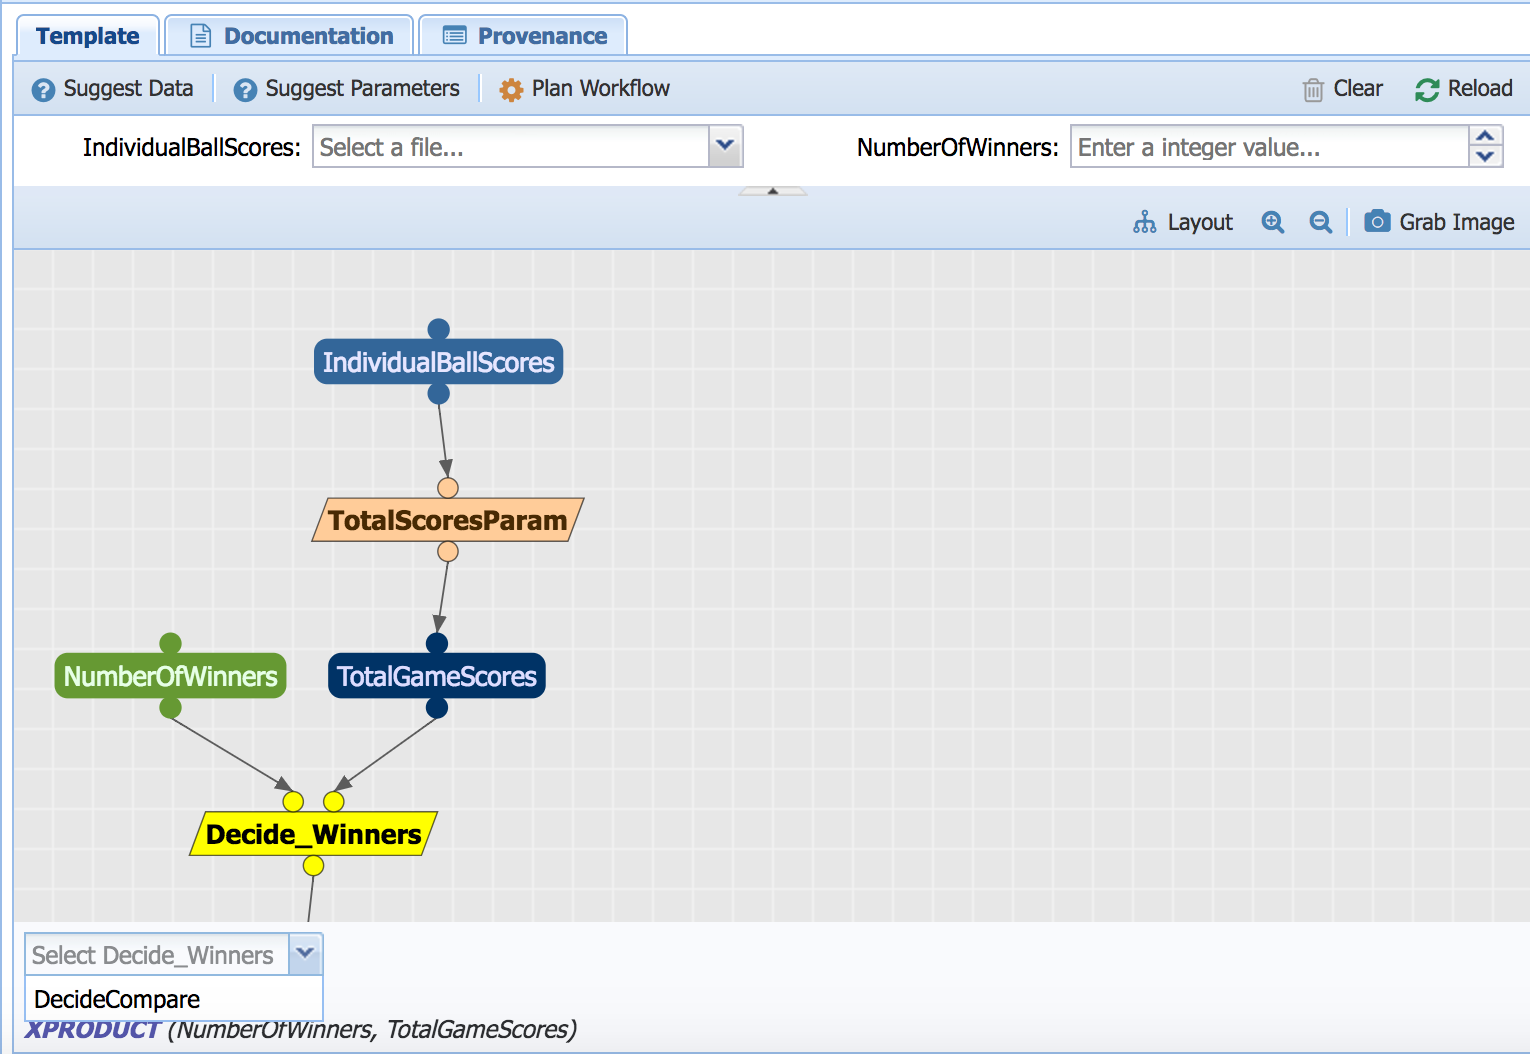
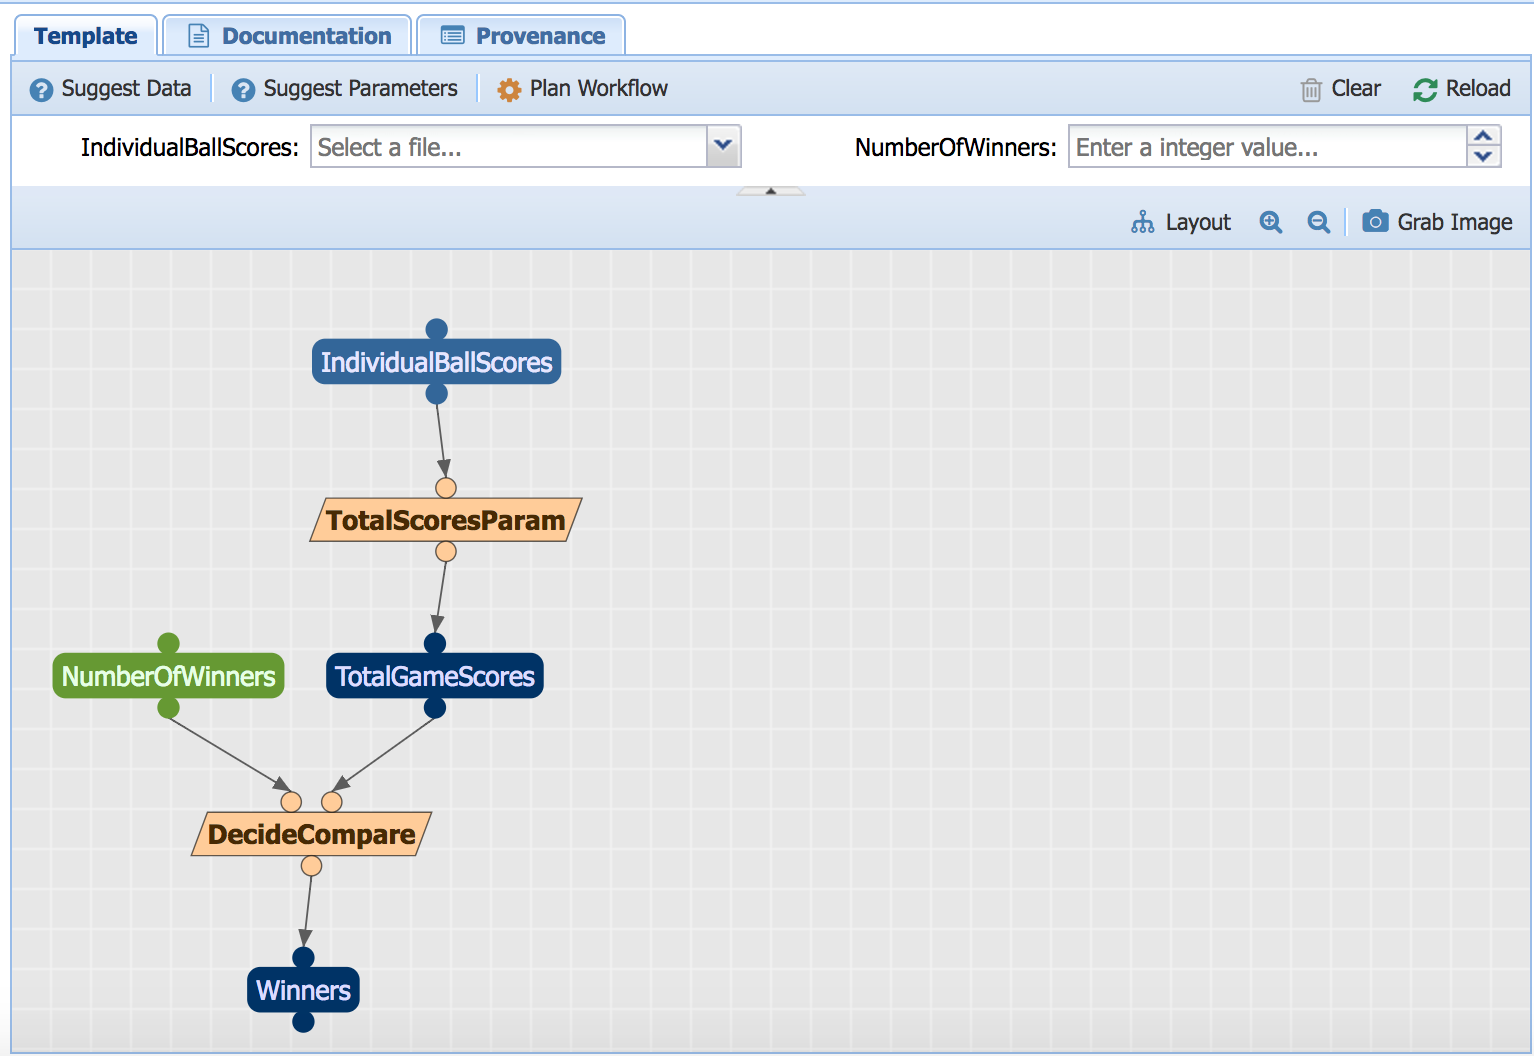
In Wings, workflows can have abstract components that represent a class of executable components. Select for example the "Words Abs" workflow:
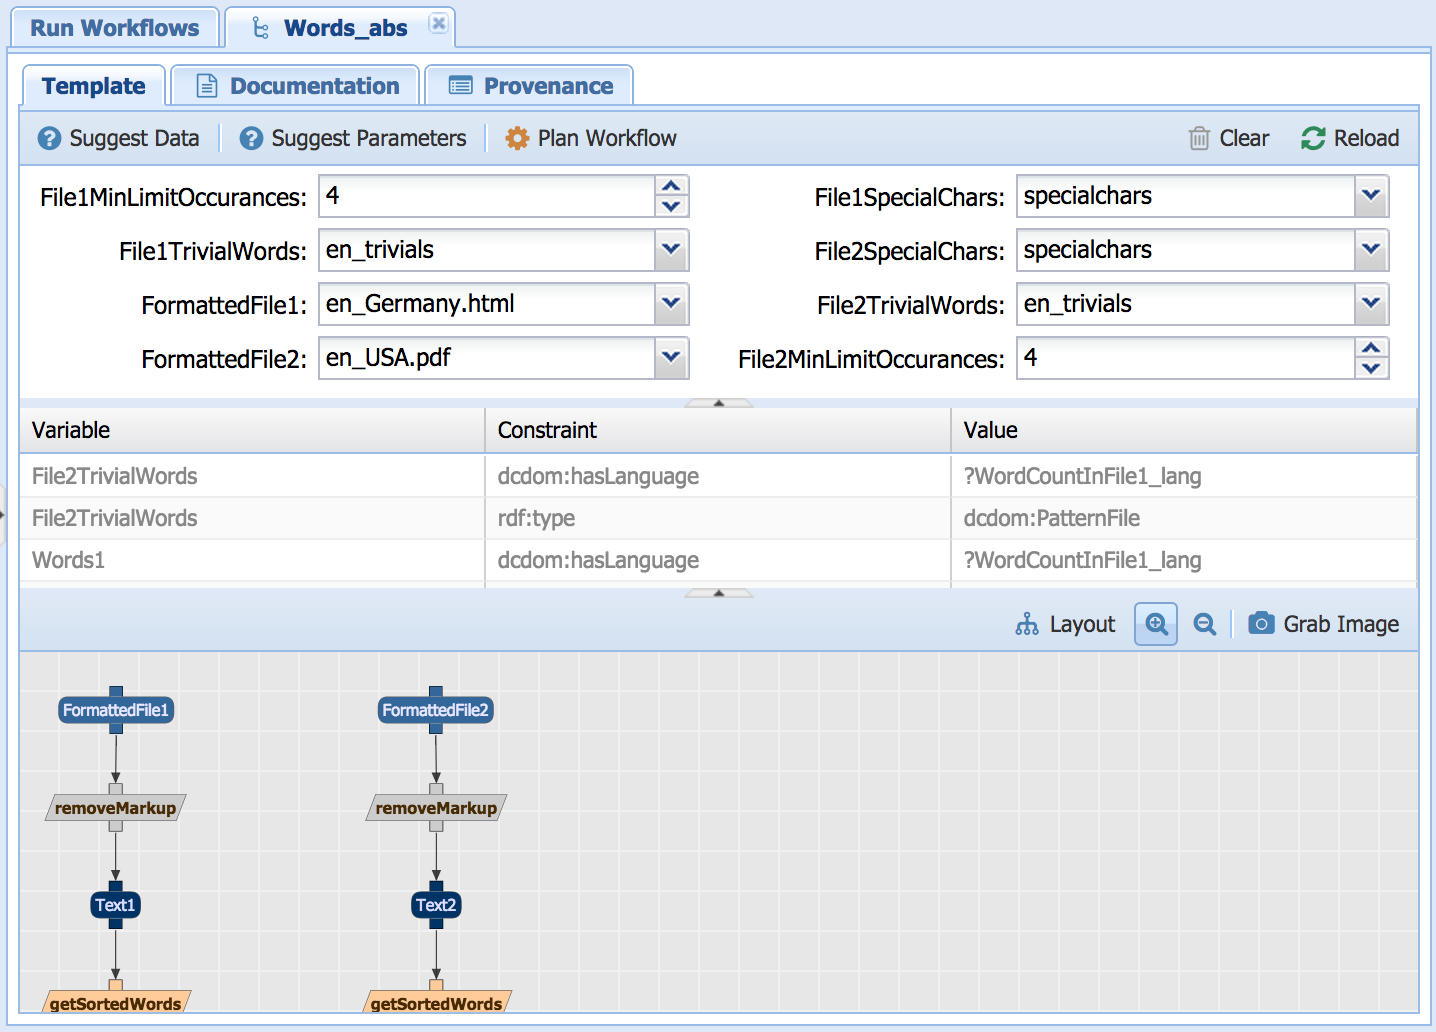
The component removeMarkup is a class of components that includes two executables: html2text and pdf2text. Depending on what kind of data is input to the workflow, the appropriate executable will be selected.
Note that this workflow is similar to the Words workflow except it is more general, as it can take in any formatted file (i.e., either an HTML or a PDF File). The "removeMarkup"component is an abstract step, and the system will specialize it automatically as an html Markup removal step or a pdf markup removal step depending upon the type of the input that is given to it.
Try for example an html file and a pdf file, and submit the workflow for execution. When you access the computation results you can see that the html2text component was used for the html file and pdf2text was used for the pdf file
You can also specify components when running a workflow. On the workflow running page, select the abstract component you want to specify. A dropdown will pop up at the bottom of the page that allows you to select the specific component you want to use for the run.
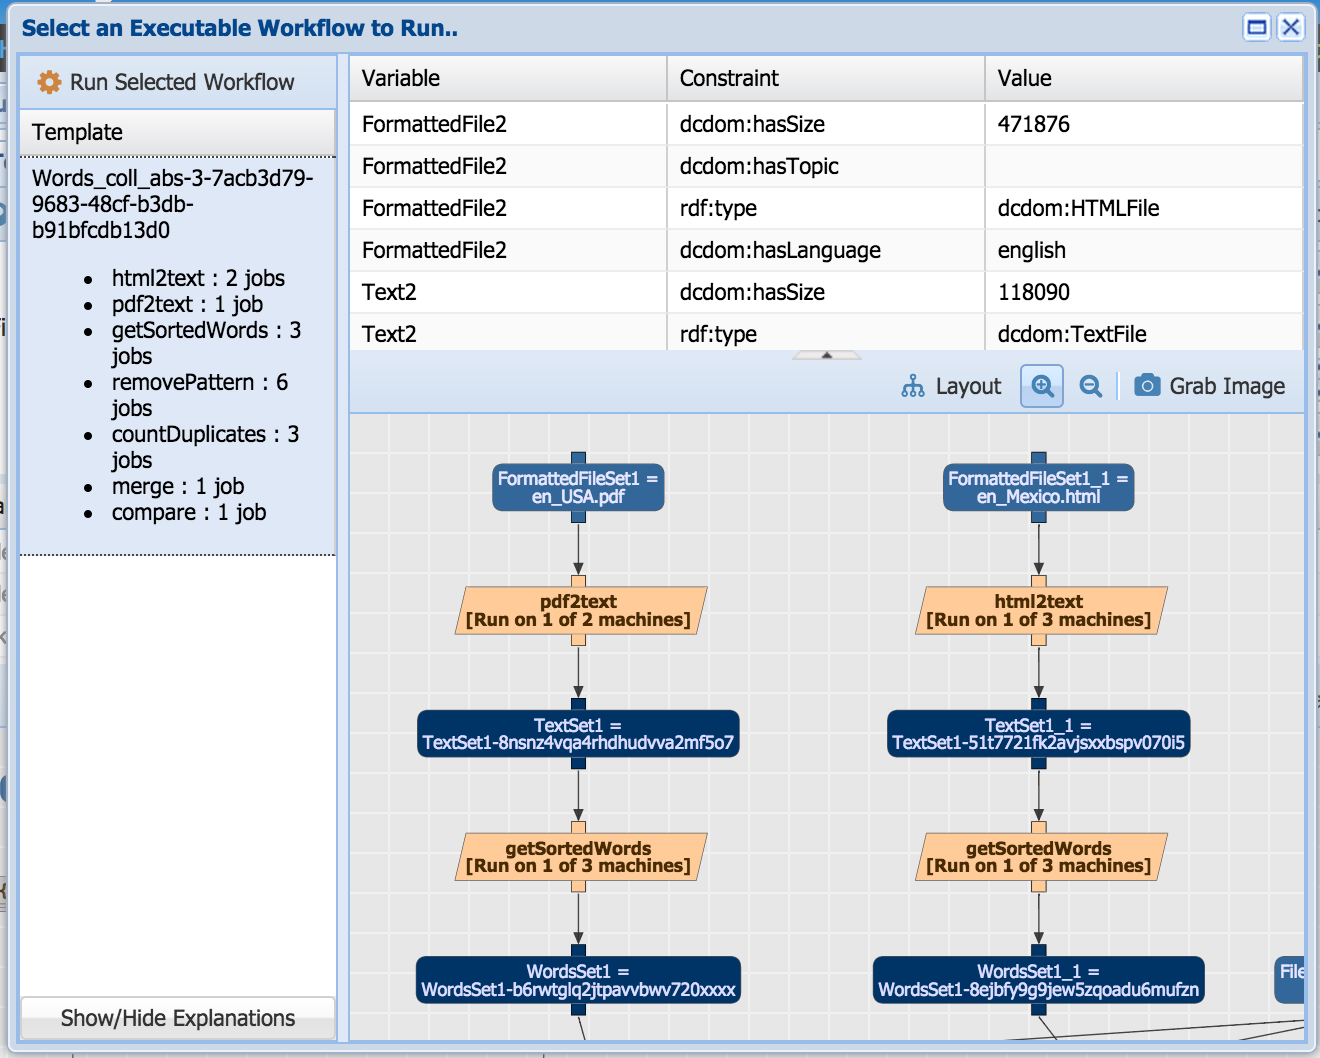
Suppose that we want to process a collection of files, some are in html format and some in pdf. We would like the workflow system to select the right workflow component for removing markup for each of the files according to their format. Wings can do exactly that. For this we need to use the Words_Coll_Abs workflow, and what we want is for the removeMarkup step to be specialized for each component of the collection.
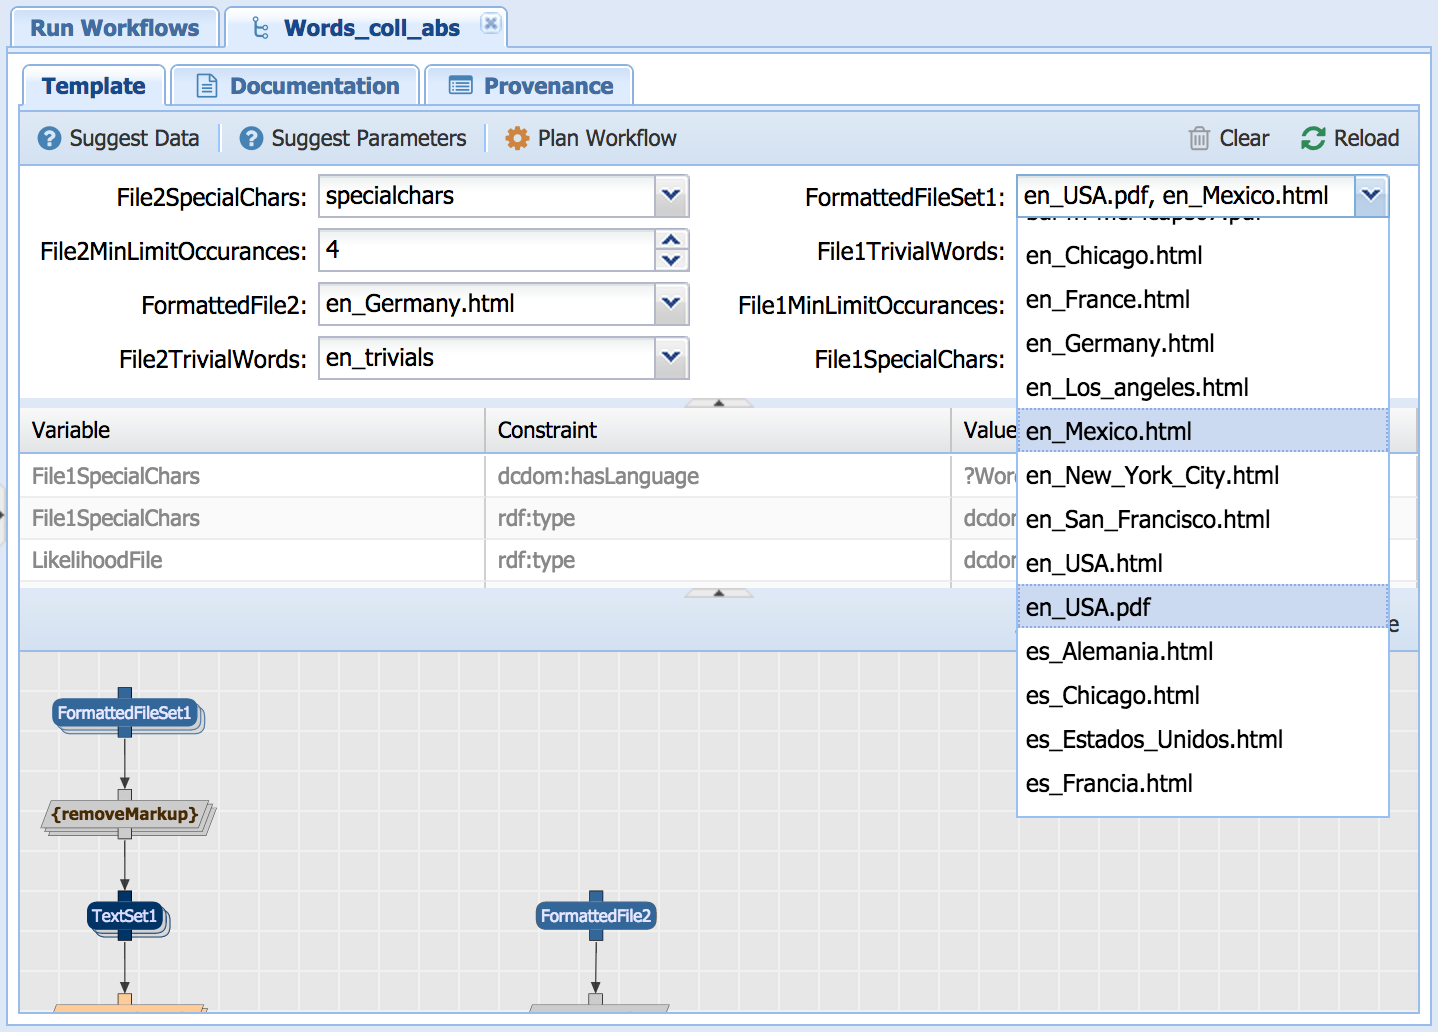
As shown above, try for example an html file and a pdf file as inputs to FormattedFileSet1, an html file as input to FormattedFile2, and submit the workflow for execution. When you access the computation results you can see that the 2 html2text components were used, and 1 pdf2text component was used:
Wings can generate automatically metadata properties for new datasets. In order to do this, the input datasets for the workflow must have their metadata properties specified. You can easily upload your own datasets and specify their properties. To do that, select "Manage Data" under "Advanced". Select the type of data that you have, and then select "Upload Files":
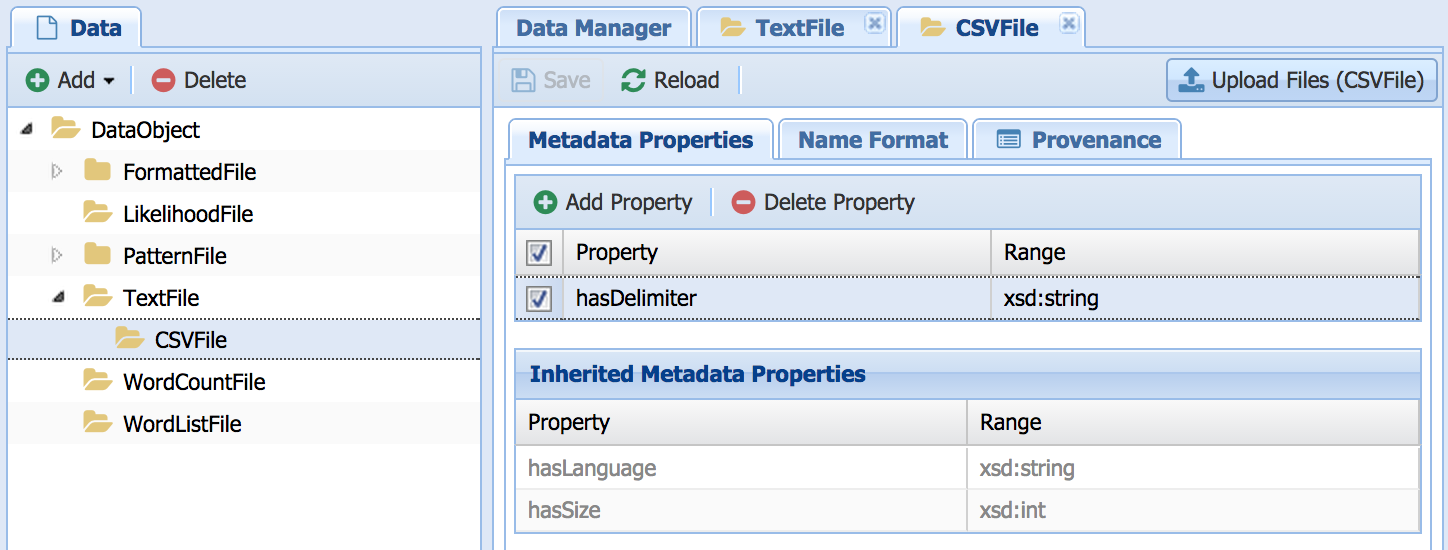
Now you can specify the metadata of your dataset. Wings will only ask for metadata properties defined for the type you had selected. For example, for a csv file it will ask for delimiter, language and size:
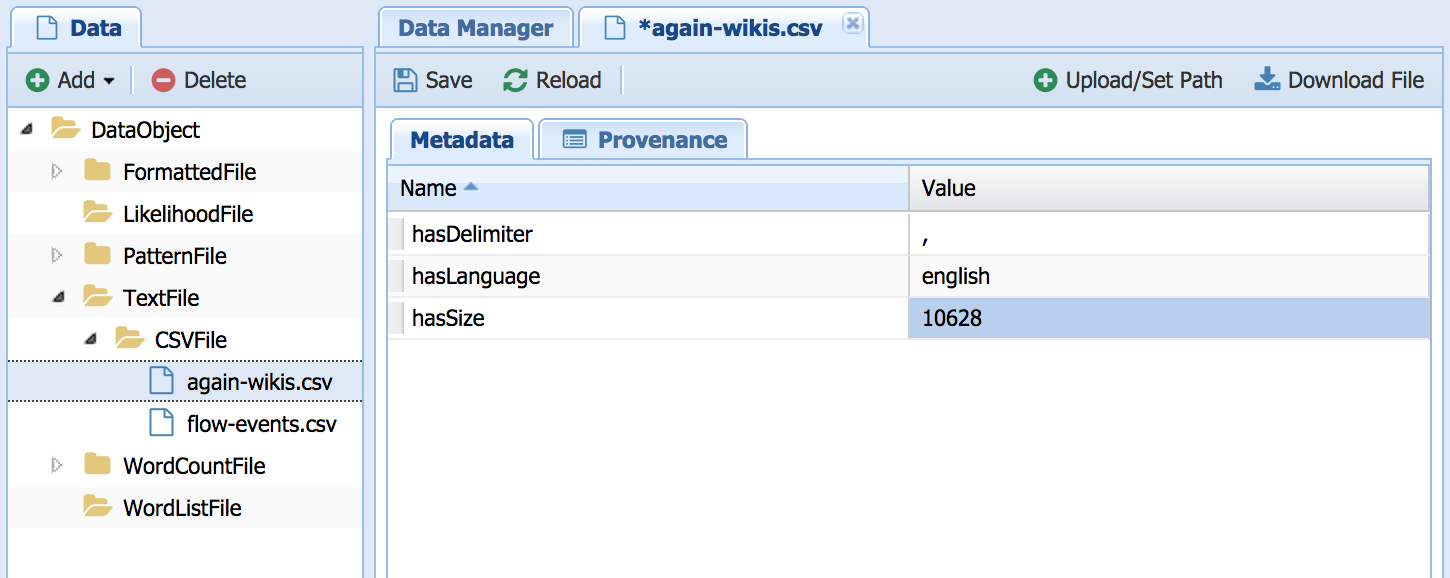
You can set the properties and click "Save Metadata" to save them
Next, you can write rules for components to generate metadata for outputs. See http://wiki.wings-workflows.org/index.php/Defining_new_Data_and_Componen... for examples.
If you go and select a workflow to run, your new dataset will show up when you select input datasets for workflows. Wings will use them to create metadata properties of new datasets, and also for tailoring its assistance to those properties of your dataset.
Besides running preexisting workflows, you can also create new workflows for you and other users to run.


The various tabs for the component type are shown below:


Now this component's IO can be described.


One can also right-click on the component type


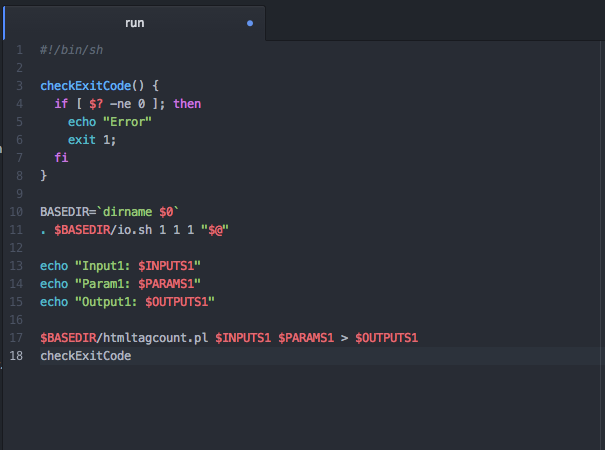
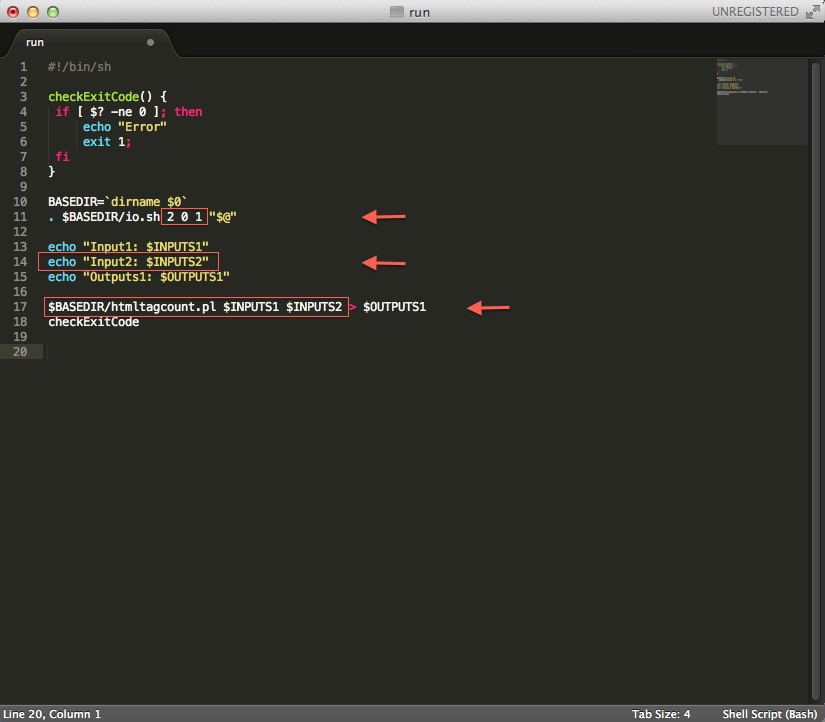
On Line 11, . $BASEDIR/io.sh 1 1 1 "$@" indicates that there is 1 Input, 1 Parameter, 1 Output. It reads the inputs and outputs and then finally calls htmltagcount.pl.
It could read differently for a different component, depending on how many inputs (including input parameters) and outputs there are. For example, if there are 2 inputs and 1 output (no input parameters), the file would contain the following code:
If the file is named differently than "htmltagcount.pl", make sure to replace the file name on Line 17, directly after $BASEDIR/".
Examples of line 17 for code in different languages:
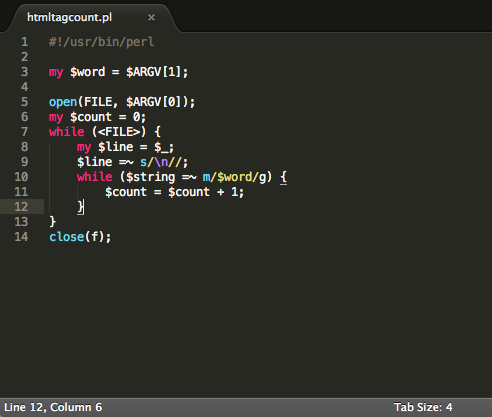
In this example, this code is written in a programming language called Perl, so it has the file extension ".pl" The process of uploading and managing components in Wings is the same regardless of the programming language your code is in. Only the file extension and the code in the file created in this step and the file name on Line 17 in Step 6 will change based on the programming language and the code being used.


In recent years several approaches for containerizing software have emerged, in order to facilitate software reproducibility. In this section, we showcase how to use containers in WINGS. We use Docker in our example due to its popularity, but other approaches may be adopted in a similar way.
docker run hello-worldYou should see the following on your screen:
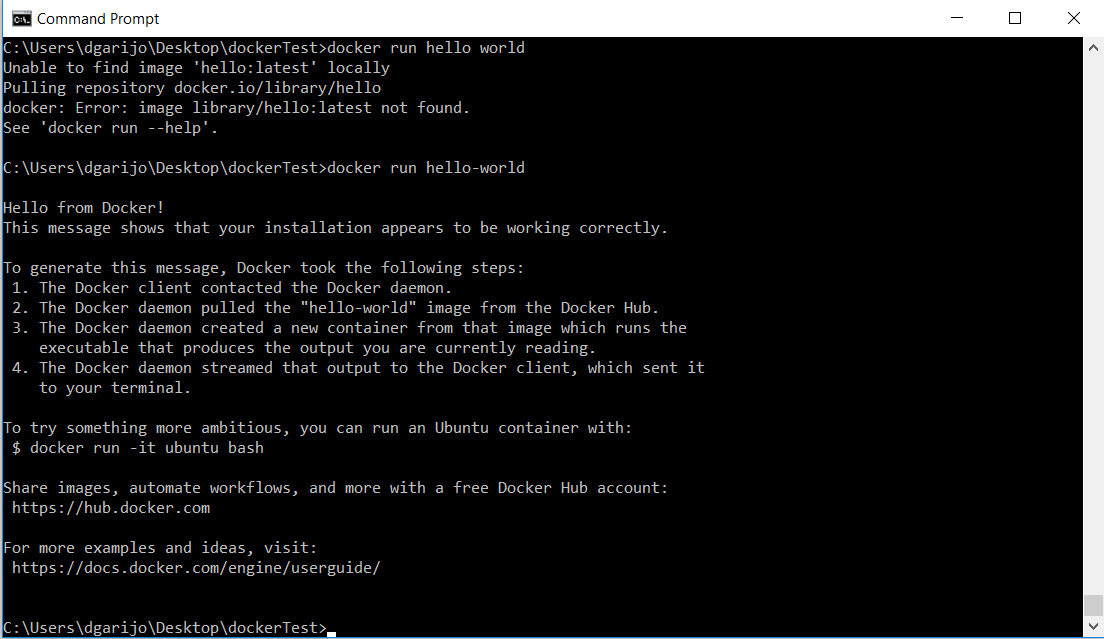
In the previous example we have created a container for the image “hello-world” and we have executed it. Docker has a local repository where it stores the images we create. Some images are stored on default repositories online, such as the one we just retrieved. When we try to execute an image, Docker tries to find it online (e.g., on the Docker hub repository). If the system finds it, it will download it to our local repository. To browse over the images stored in your local repository, run the following command: docker images. At the moment you should only see the “hello-world” image.
Download an Ubuntu image. Execute the following command:
docker run ubuntuThis will install a whole clean Ubuntu image on your local repository. In order to test it, run any unix command like:
docker run ubuntu echo hello world
You should see something similar to the following:

Which is the same output you would obtain when executing that command in a terminal. If your software is widely used, someone probably will have created an image and posted it online. In this example we will show how to reuse an image for samtools, a commonly used biomedical software.
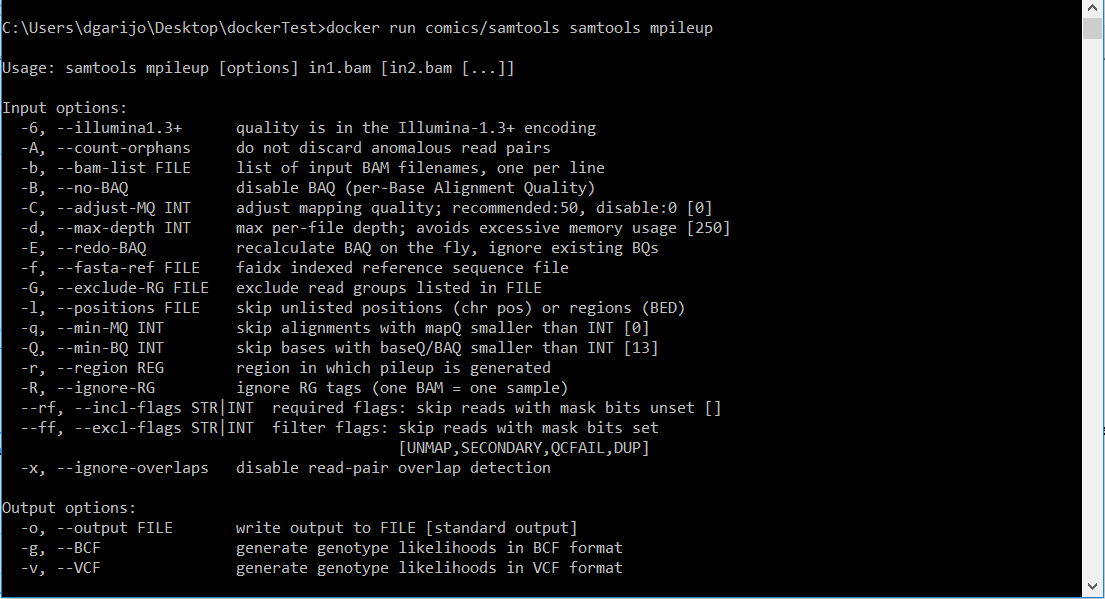
Action: Download a samtools image and test it on your local computer. After looking in docker hub, we can see that the official release for samtools is comics/samtools. Therefore, in order to import it to our local domain, we just have to perform the following command:
docker pull comics/samtoolsWhich will download the latest version. You can also specify the version by using the tag. For example comics/samtools:v1. Now you can try to execute the image locally, to see whether it works. Let's try to invoke the mpileup software:
docker run comics/samtools samtools mpileupSince we have not specified any inputs, you will see the following on screen.
Execute the following command:
docker run -v PathToFolderYouWantToShare:/out comics/samtools samtools sort -o
    /out/sorted.bam /out/inputFileToSort.bam
Where the PathOfTheFolderYouWantToShare is the folder where you have your input file ("inputFileToSort.bam"). This will result in a sorted file ("sorted.bam") of the input file “inputFileToSort” in the folder "PathToFolderYouWantToShare". Now that we have tested our image locally, we should test it in Wings.
Create a component in WINGS and use the Docker image to invoke it (you can find a component template in this link). The component should look similar to the picture below:
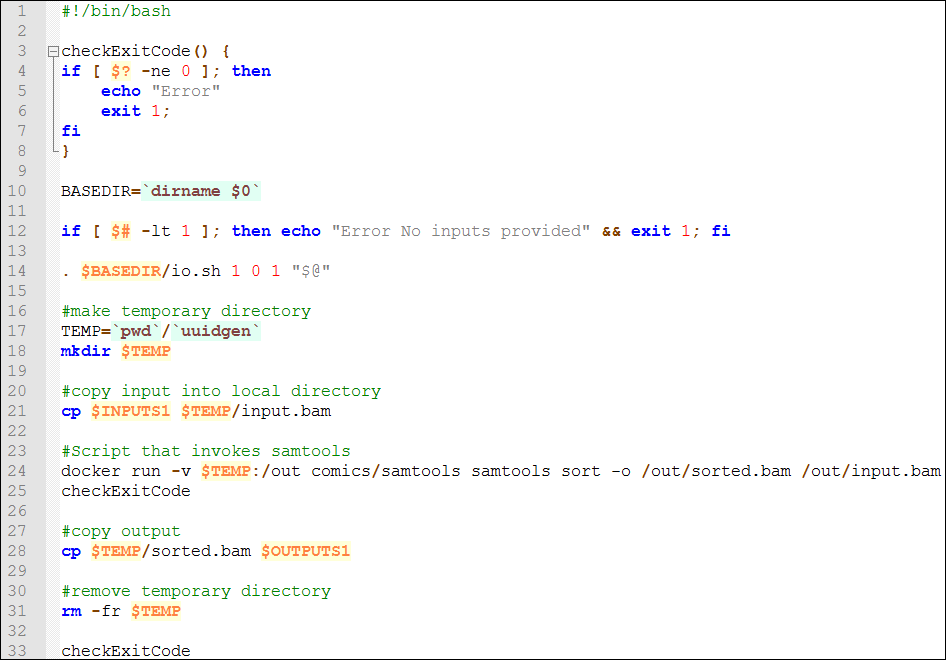
The script is similar to the console command we have executed locally, but copies the input to a temporary folder. This way if we have ten instances of the component at the same time, they will read the appropriate temporary folder. The temporary folder is mounted in WINGS using the "-v" Docker command we have used previously. The outputs are copied to the corresponding WINGS output (using "cp"), and the local files are removed ("rm" command).


If you will be a workflow system administrator and would like to set up Wings on your site (either on a single machine such as a laptop, or on a grid, cluster, or cloud) go to our download page


Another example for Matlab:


Or for Matlab:


This is a brief glossary that describes the terms used in Wings manuals and tutorials. Note that the same terms may be used differently in other systems.
Abstract Workflow -
A workflow whose computations are not fully specified. An abstract workflow 1) may contain abstract steps (i.e., some steps may represent a class of components), 2) may be missing steps and dataflow links (i.e., only specify some of the steps in the workflow), 3) may contain descriptions of the types of data products desired. An abstract workflow can be used as a starting point to automatically generate an execution-ready workflow through workflow elaboration.
Component - See workflow component.
Component Catalog -
A catalog that contains unique identifiers of executable software components or component classes available to the workflow system as workflow steps, together with descriptions of each component in terms of semantic constraints that restrict 1) the characteristics of its input datasets, 2) the appropriate values of parameters for given input data, 3) the required characteristics of input datasets given specific parameter values, 4) the required characteristics of input datasets and appropriate parameter values to generate a required kind of result.
Component collection -
A collection of computations grouped according to some property or criterion and to be processed either within a workflow through parallel computations or by several workflows each processing one item of the collection.
Data Catalog -
A catalog that contains unique identifiers of datasets available to the workflow system, together with descriptions of each dataset in terms of its metadata properties.
Data Types -
Data types have to be made in order to add properties to data. After assigning properties to data types, property values can then be assigned to the data under it. Components must input and output certain data types. Properties of data describe the content of the data file, and examples include size, date, and format (i.e. integer, float, string, etc.).
Dataset -
A file that contains data to be processed by workflow components.
Input datasets are input to a workflow, final datasets are the final results of a workflow, and intermediate datasets are any datasets obtained during workflow execution that are not final results sought by the user. Datasets have associated metadata properties.
Data collection - A collection of individual datasets grouped according to some property or criterion and to be processed by a workflow through parallel computations when possible. Data collections may be nested, so can parallel execution paths in a workflow.
Dimensionality - Data can have characteristics such as length, width, depth, and time, all of which give the dataset dimensionality. Each of these elements gives a dataset an additional dimension. Although colloquial English suggests that there is a specifically numbered dimension that corresponds with each of the examples listed above (e.g., time is the 4th dimension), this is not the case in data science. For example, if you have measurements from a sensor over time but do not have the longitude, latitude, and altitude of the sensor, the data is only one-dimensional because it extends in only one direction (time).
A common application of dimensionality in WINGS is for split components. Split components take larger dataset and split it into smaller datasets based either on size or some other element. If the input data is 0-D before the split, the output is now 1-D. Splitting the data extends the data in another direction, thus increasing its dimensionality.
Domain - Domains serve as workspaces in which you can organize your projects. Creating different domains for various tasks helps to prevent confusing components and makes elements of the workflow easier to find. Domains can be thought of as analogous to windows within a web browser and related templates are like related tabs within a window.
Executable component - See workflow component.
Execution-ready workflow -
A workflow that is fully specified at the application level and can be submitted to a workflow mapping and execution engine. To be fully specified at the application level the workflow must have: 1) all input datasets bound to an existing dataset, 2) all parameters bound to a specific value, 3) all workflow steps must be executable components.
Metadata property -
A property of a dataset, which is represented explicitly and separately from the data itself. Examples of metadata properties may be the type of data, the size of a dataset, statements about the methods used to obtain a dataset, and accuracy measurements.
Parameter -
An input to a software component that enables configuring it to obtain different results. Examples of parameters include a threshold value, the number of iterations within the component, and filtering criteria. Parameters are treated differently from datasets as the nature of the input datasets to the component often determines what parameter values are more appropriate.
Parameter Type -
The parameter type specifies what values are possible for the parameter. The paramter types available in WINGS include string, boolean, int, float, and date.
Port -
Ports describe the inputs and outputs of components. In a valid workflow they are linked to data variables. In the editor, input (resp. output) ports appear as little boxes above (resp. underneath) the component.
Variable - See workflow variable.
Workflow -
A workflow represents a complex computation declaratively as a set of software components and their data flow dependencies. In some cases a workflow also contains control flow dependencies. Workflows are often diagrammed as a graph whose nodes are the computations (the software components) and the links reflect the dataflow. See workflow template, execution-ready workflow, and abstract workflow.
Workflow component - A workflow component can be used as a step in the workflow. It is either 1) an executable software component that is encapsulated and can be directly executed, or 2) a class of software components (also called an abstract component) whose instances are executable software components.
Workflow elaboration -
The process of taking an abstract workflow and generating an execution-ready workflow.
Workflow step - See workflow component.
Workflow system -
Workflow systems exploit workflow representations in order to manage the elaboration and execution of
workflows that process very large datasets in a distributed environment.
Workflow template -
A workflow that has one or more unspecified inputs and therefore is has more generality than a fully specified workflow that only applies to its defined inputs. Workflow templates are more reusable than fully specified workflows. To execute a workflow, a user can take a pre-defined reusable workflow template from a library and then specify the inputs of interest.
Workflow variable -
Wings assigns a unique variable to each component, dataset, and parameter of a workflow. These variables are used to assert semantic constraints. A data variable is a variable associated with a dataset. A parameter variable is a variable associated with an input parameter of a component of the workflow.


